It’s easy to be floored when your Xbox One greets you with an orange light from the unit’s power brick once turned on. While this can be disconcerting news, take a step back — a little guidance should let you handle this issue quickly.
The Xbox One power supply orange light issue means that it’s stuck on standby mode due to a faulty power outlet or a console error. Fix this by switching to another power outlet or resetting the console.
It shouldn’t be that hard. In this post, we’ll get down to the nitty-gritty and show you all the details you need to know to factor in an effective Xbox One power supply orange light power brick fix, so you better read up.
How to Fix Xbox One Power Supply Turns Orange
Various solutions can be used as an Xbox One power supply orange light power brick fix. But let’s not be hasty in our actions or you could be adding fuel to the fire.
The trick here is to assess the situation carefully before jumping in. Note the appropriate solution to this problem will depend on the behavior of the power supply light, which may keep blinking orange or be a constant orange glow.
You can refer to what to do based on how your Xbox One’s power supply light behaves. This way, you can apply the necessary fix for the exact problem that your Xbox One console is experiencing at the moment.
ISSUE: Blinking Orange Light
The status light on the power brick (or power supply) of your Xbox One isn’t supposed to be blinking at all. Simply put, this means you might be looking at a serious hardware issue.
Unfortunately, you can’t troubleshoot your Xbox power brick in this case. As such, there are only two things that we can recommend you try as a permanent solution as a power supply orange light power brick fix.
FIX 1. Replace your Xbox One’s power brick
| Difficulty | Very Easy ●○○○○ |
| Number of Steps | 1 |
| Time to Perform Fix | 30 to 60 seconds |
| Things Needed | A replacement Xbox One power brick/supplyA smartphone or PCA working internet connection |
As mentioned earlier, your Xbox One’s power brick isn’t supposed to be blinking under normal circumstances as it’s a clear sign of fault or damage. Refer to the sticker on your power brick as this is designated as a fault alarm.
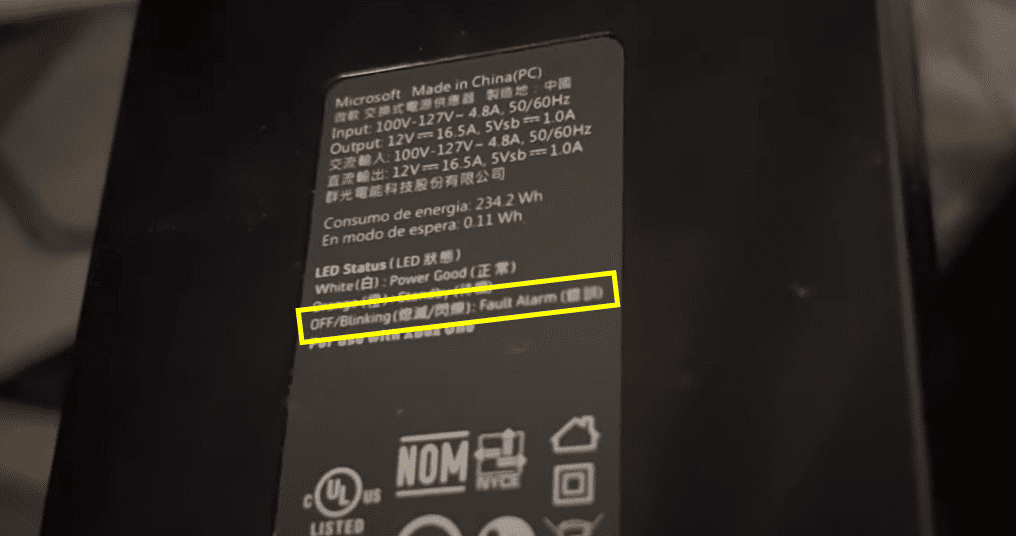
You’ll only encounter this problem if the Xbox One’s power brick has already gone wrong. Getting a replacement could be the only Xbox One power supply orange light power brick fix for this specific problem, an action even Microsoft recommends.
Unfortunately, this entails another problem for you: Microsoft has already stopped out-of-warranty support for Xbox One systems. They no longer provide service or manufacture Xbox Ones and any of its accessories, the power brick including.
Your only option is to buy a secondhand power brick replacement from a former Xbox One user or get a third-party one. Third-party power bricks from eBay and Amazon should be timely.
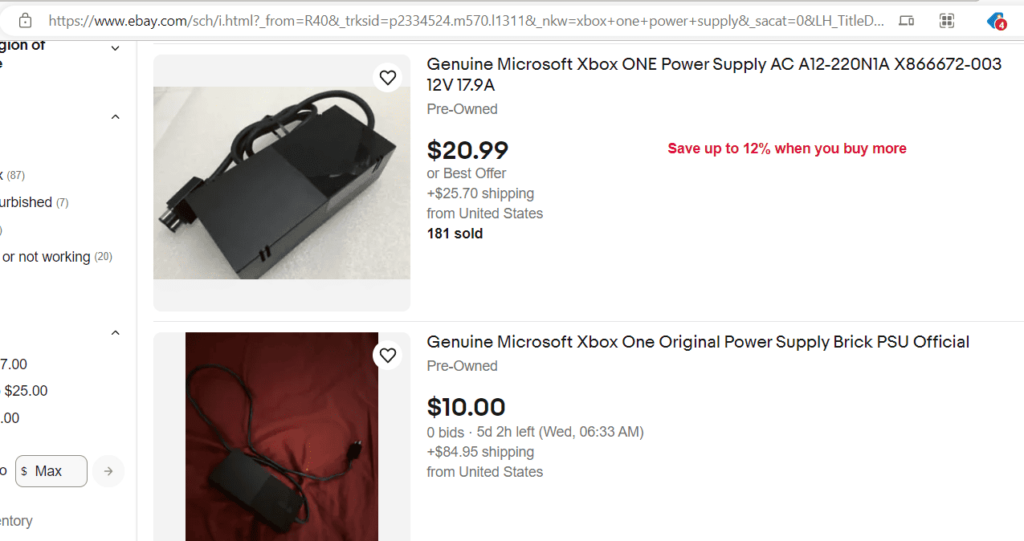
FIX 2. Bring your faulty power brick to a repair shop
| Difficulty | Easy ●●○○○ |
| Number of Steps | 1 |
| Time to Perform Fix | 5 to 10 minutes |
| Things Needed | A nearby console repair shop |
Sometimes, the blinking orange status light on your Xbox One’s power brick will turn yellow as well. This issue is different but this means you might have a chance to save the faulty power brick or prolong its life at least.
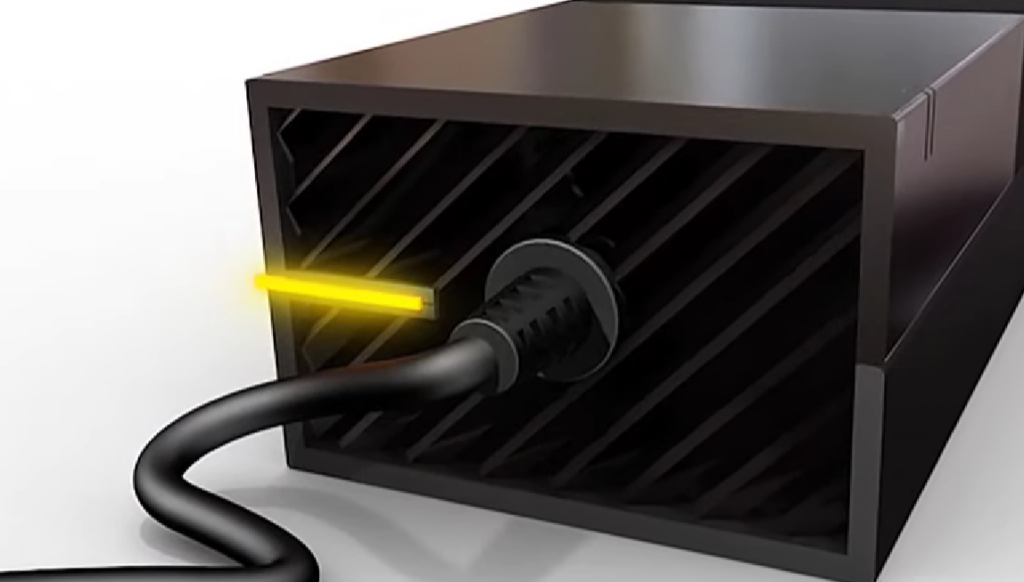
Please note that you can only use this solution if the blinking orange light keeps turning yellow. Otherwise, you’re just stuck with the previous solution and there’s nothing you can do to troubleshoot your Xbox One’s power brick.
If the status light turns yellow, the Xbox One power supply orange light power brick fix for this is to send it to a repair shop that provides services for consoles. It’s your best bet since Microsoft no longer provides service and support for Xbox One.
Depending on where you live, you might find a good amount of console repair shops or not at all. If there isn’t one near you, then getting a replacement power brick for your Xbox One is the only way to go.
ISSUE: Constant Orange Light
When you have a power supply issue on your Xbox One system, you best hope that the status light has a constant orange glow. If so, it’s a good sign you can administer some troubleshooting solutions.
You can troubleshoot this issue because the problem has to do with the electricity and not the power brick/supply itself. Here are ways you can fix this:
FIX 1. Switch to another wall outlet
| Difficulty | Very Easy ●○○○○ |
| Number of Steps | 1 |
| Time to Perform Fix | 10 to 30 seconds |
| Things Needed | A working power outletA multimeter or voltmeterA step-down transformer |
The quickest and easiest way of solving any power supply issue is to make sure that your Xbox One’s power brick plugs into a working power outlet. Use a multimeter or voltmeter to get a reading on the power outlet that you have at home.
Doing so lets you check if your power outlets are outputting enough electricity to power your Xbox One console. If you have a faulty power outlet, you must transfer your Xbox One’s power brick to another power outlet that works perfectly.
You must also plug the power brick into an outlet with the recommended voltage. The required voltage is detailed on the power brick’s sticker and will vary depending on what region the Xbox One console is from.
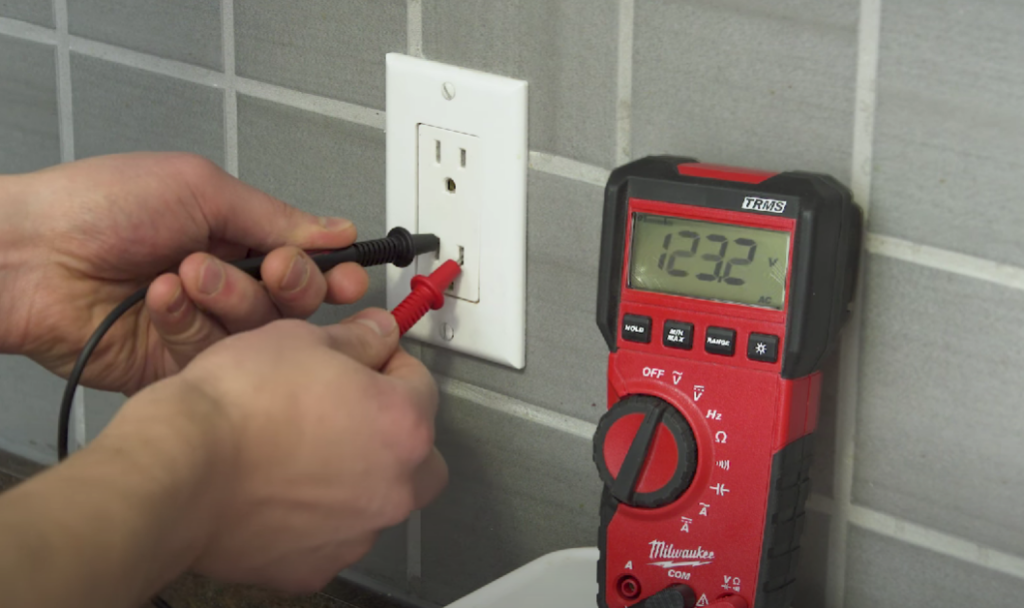
| WARNING: Check the power supply details before you plug it in. If it says 110 V, you can’t plug it into a 220 V outlet, or it gets fried; if it denotes 110 – 220 V, you can plug it just about anywhere. |
Xbox One consoles made for the US market will come with a power brick with an input of 100V to 127V. It means you can’t plug it into a 220V power outlet without using a step-down transformer to lower the voltage.
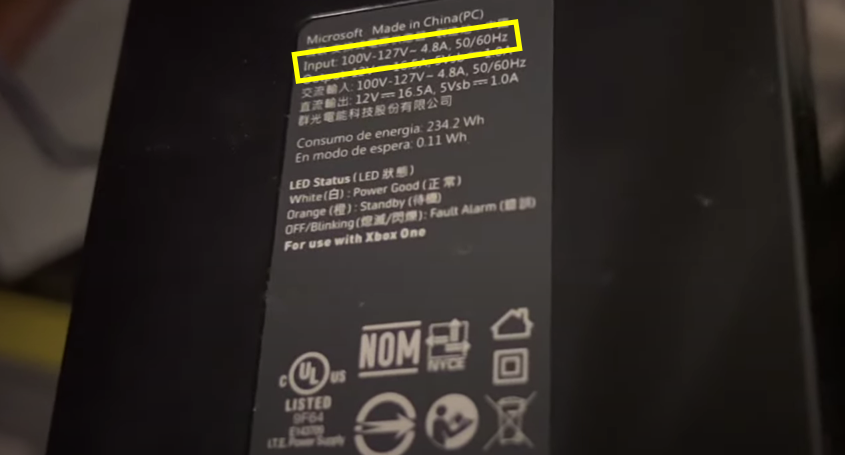
Alternatively, you can also buy a replacement power brick with a voltage rating that’s compatible with your power outlets. It’s an easy Xbox One power supply orange light power brick fix since it’s not built into the console and can be replaced.
FIX 2. Disconnect your Xbox One’s power brick
| Difficulty | Easy ●●○○○ |
| Number of Steps | 5 |
| Time to Perform Fix | 10 minutes and 20 seconds |
| Things Needed | A working power outlet |
Another solution we recommend you try is to disconnect your Xbox One’s power brick from the console and the power outlet. Doing so will power cycle it, allowing it to shut down and complete a reset sequence.
This particular fix effectively deals with power supply issues causing the console not to receive any electricity. Do this when the power brick is stuck in standby mode, even when plugged into a wall outlet.
It’s also important to check if the Xbox One power brick is connected securely to your power outlet. Believe it or not, a simple loose connection is often the root cause of various power supply issues, which causes the console not to receive any power.
| Step 1: Unplug the power cable from the console and outlet to disconnect the power brick. |
| Step 2: Unplug the Xbox One power brick for 10 minutes to power cycle it. |
| Step 3: Plug the power cable back into the power outlet first and check if the status light of the power brick turns on. Note: If the light turns on, continue to the next step. If it’s blinking or turned off, the power brick/supply unit is faulty and must be replaced. |
| Step 4: Plug the other end of the power cable back into the Xbox One console and watch if the status light stays on. Note: The status light of the power brick must stay on so you can proceed to the next step. If it doesn’t stay on, you must replace it since it’s already faulty. |
| Step 5: Press the Xbox or power button |
It’s important you observe the time element as prescribed. Unplugging the power brick for 10 minutes ensures it resets completely.
FIX 3. Reset your Xbox One.
| Difficulty | Very Easy ●○○○○ |
| Number of Steps | 5 |
| Time to Perform Fix | 45 seconds |
| Things Needed | Working Xbox One console buttons |
The Xbox One console has a secret button combination that allows you to perform a quick reset whenever it’s experiencing any issues. This trick is helpful in all sorts of situations since all it does is shut down the console and reboot it.
As such, we believe this is the best and safest solution you can try because you don’t risk losing your console’s installed apps and games or game data.
To do this, you need a working Xbox or power button, Sync or pair button, and eject button on your console. After all, the secret button combination involves pressing all three buttons on your console simultaneously.
| Step 1: Eject any mounted disc inside your Xbox One console beforehand. |
| Step 2: Press and hold the Xbox or power button, sync or pair button, and eject button simultaneously. Note: This will require you to use two hands. You can also ask someone for help if you’re unable to do so. |
| Step 3: Release only the eject button after 10 seconds or when the Xbox or power button starts to flash. |
| Step 4: Release the Xbox or power button and the sync or pair button after 15 seconds. |
| Step 5: Press the Xbox or power button |
| Step 6: Check the status light on the power brick. |
The steps above can be done single handedly. But if you’re having issues, soliciting a helping hand is wise especially if you have trouble simultaneously pressing the buttons.
What color is the Xbox One power brick’s status light supposed to be?
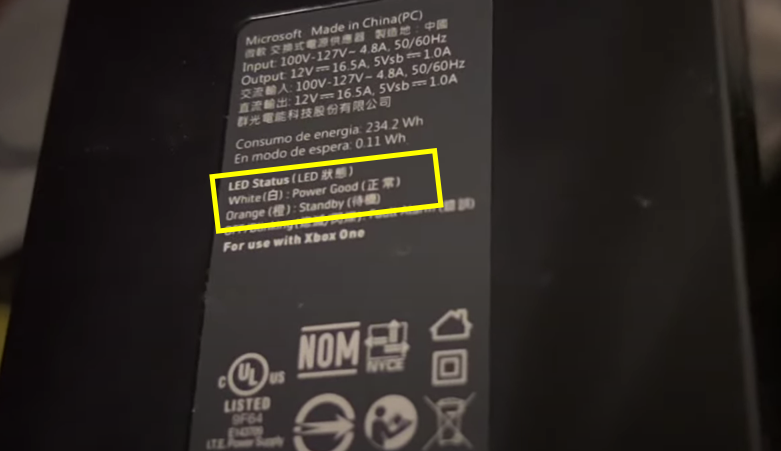
There are only two color schemes that you can expect to see on the status light of a working Xbox One power brick. Whether the console is turned on or in standby mode, it will be white or orange, and the glow must be constant and not blinking.
If the power brick is plugged into a power outlet, the status light will stay orange to indicate that it’s in standby and power-saving mode while your console is turned off. It will only switch back to a solid white light once you turn on your Xbox One console.
As previously mentioned, you can check this detail from the sticker of your Xbox One’s power brick, as seen in the example below.
Other Common Issues with Xbox One’s Power Supply
Several other issues can cause problems with your Xbox One’s power supply, which can also affect how the status light on the power brick behaves.
Sometimes, your Xbox One console may stop turning on due to these issues, as listed below. And to help you minimize downtime as much as possible, we’ve also provided solutions for each of them!
Insufficient Voltage
Meeting the required voltage is a must to ensure that your Xbox One’s power brick is getting sufficient power. As mentioned, the voltage requirement will depend on the region your Xbox One console is marketed for.
For regions like the US, where 110V is the national standard, Xbox One consoles will come with a power brick with a 100V to 127V rating. As such, you need to match the power brick with the voltage of the power outlets in your household.
With a 220V power outlet, you need a step-down transformer to plug in a 100 to 127V power brick safely. Alternatively, you can also buy another Xbox One power brick rated for 100V to 240V if that’s more convenient and cheaper for you.
Overheating
Overheating is a big concern for most gaming consoles since they sometimes need to maintain high performance, especially on graphics-heavy games. It’s why your Xbox One’s power brick has a built-in cooling fan to help regulate its temperature.
Unfortunately, this might not be enough when your console isn’t stored in an ideal place. If possible, always place your Xbox One console in an area with proper ventilation and good airflow to help dissipate heat faster.
If you’re handy with electronic devices, it’s even good to disassemble your Xbox One’s power brick so you can clean its cooling fan. This way, you can remove any dust buildup affecting its ability to cool the power brick down.
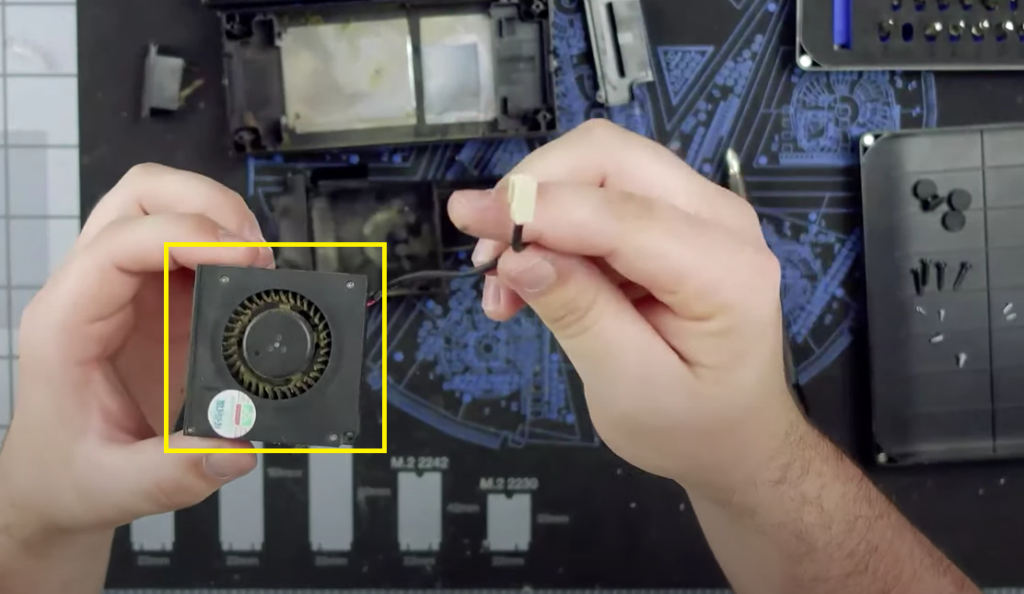
Overheating your Xbox One console can lead to various issues involving its power supply and performance. We also recommend unplugging and shutting down your console after every use to get it time to cool its system down when not in use.
Malware-Induced System Malfunction
| Difficulty | Easy ●●○○○ |
| Number of Steps | 6 |
| Time to Perform Fix | 10 minutes |
| Things Needed | Xbox One controller |
Malware and corrupt data are big contributing factors to most software-related issues and system malfunctions. Your Xbox One console isn’t an exception to this, which is why it’s good that there’s a way to eliminate unwanted files and data from its system.
You can do this by factory resetting your Xbox One console and restoring its default factory settings.
The console allows you to keep your games and apps intact, but removing everything is the best way to eliminate malware and corrupt data. Here’s how to do it:
| Step 1: Press the Xbox button Note: Your Xbox One console must be updated to the latest firmware and connected to the internet when performing the reset process. |
| Step 2: Scroll down and open your Xbox One’s Settings. |
| Step 3: Scroll down to System and navigate to the left to access the Console Info. |
| Step 4: Scroll down and select Reset Console. |
| Step 5: Choose between the RESET EVERYTHING and RESET AND KEEP MY GAMES & APPS options. |
| Step 6: Wait for the console to complete the factory reset and set it up once it boots up. |
You may be wondering about the reset options given. If you’re just troubleshooting a particular problem, a reset and keep my games and apps is recommended but if you’re selling or giving the unit away, the remove everything option is best.
Of course, that would mean all your saved games and preferences are lost in the process.
Tips to Prevent Issues With Your Xbox Power Supply
Prevention is always better than cure, which is why we have some tips that will help prevent issues with your Xbox One’s power supply. Below is a list of some notable things you need to keep in mind to care for your Xbox One’s power supply unit.
- Ensure that the power brick is also plugged in securely to your power outlet.
- Only plug the power brick into a power outlet with a compatible voltage rating.
- Unplug the power brick whenever your console is not in use to let it cool down.
- Store the console and power brick in a well-ventilated area during use to better dissipate the heat they’re producing.
- Don’t block the air vents on the power brick.
- Don’t put other electronic devices on top of the power brick.
- Keep any heat sources away from the power brick.
- Keep the console and power brick away from your AC unit to prevent water damage due to moisture buildup.
Xbox One is designed to work for extended periods of time so you can leave it on overnight without issue. But you should not make a habit out of it as you run the risk of overheating the console, damaging the system in the process.

![Xbox One Power Supply Orange Light [Why and How to Fix]](https://www.techjive.com/wp-content/uploads/2024/01/Xbox-One-Power-Supply-Orange-Light-Why-and-How-to-Fix.png)


