Expectations are a double-edged sword. And that’s exactly what happens when the Optical Out of your Samsung TV, a connection that promises high-quality audio, fails you and produces no sound.
When your Samsung TV Optical Out stops working, you miss out big time on experiencing nail-biting movies. Luckily, there are solutions you can DIY to fix the issue and let a dream surround sound experience come alive.
The Samsung TV Optical Out not working issue can be fixed by navigating to Settings > Sound > Sound Output to set it to Optical. You can also go to the expert settings to set the HDMI Input and Digital Output Audio Format to PCM.
In this guide, we’ve compiled seven proven-and-tested methods to troubleshoot your Samsung TV’s faulty Optical Out. Don’t worry about the details as we’re giving you the nitty gritty so you can do it all on your own — with confidence.
What is the Audio Out/Optical Out on Samsung TVs
The digital audio out/optical out is a port on the rear panel of Samsung TVs to connect an optical audio cable from an audio device. It allows your Samsung TV to communicate with the audio device to establish an audio data transmission.
Optical audio cables use a red light to facilitate the transfer of audio data signals on your Samsung TV and external audio device. Using the audio out/optical out on your Samsung TV is great when connecting to a stereo speaker or home theater system.
Just like HDMI, Toslink optical cables provide digital transmission. For one, they’re cheap, and though they’re not as popular as HDMI cables, they are less prone to interference and can provide quality sound output even for longer distances.
How to Fix Samsung TV Optical Out No Sound
Below are the most effective ways to fix a faulty Samsung TV Optical Out that isn’t generating any sound. While you can always cherry-pick and jump to a particular solution, we recommend you apply them in the order they are presented.
1. Unplug your Samsung TV from the power socket.
| Difficulty | Very Easy ●○○○○ |
| Number of Steps | 2 |
| Time to Perform Fix | 30 seconds |
The very first thing we recommend you do as soon as you experience the Samsung TV Optical Out not working issue is to shut down and reboot the device forcefully. Achieve this by unplugging your Samsung TV’s power cable from the power socket.
Performing this action allows your Samsung TV to refresh its system memory by shutting down all of the apps and programs it’s running at once.
Not only is this method effective at fixing minor errors, but it also improves your Samsung TV’s performance. In short, it’s an easy-to-do solution that could fix the issue right away.
For best results, we recommend keeping your Samsung TV unplugged for a while instead of plugging it back in immediately. You can wait for at least 30 seconds but keep it going for a lot longer to help discharge its residual electrical energy.
| Step 1: Force shut down your Samsung TV by unplugging its power cable from the socket.  |
| Step 2: Wait for at least 30 seconds before plugging the power cable back into the power socket to boot up your Samsung TV.  |
2. Run a sound diagnostic test and reset the sound settings.
The issue with Samsung TV Optical Out failing you might result from a sound problem on the unit and not the optical audio port itself. You can test this theory by performing a sound test under the self-diagnosis menu of your Samsung TV.
Your Samsung TV will play sample audio during the sound test that you can listen to so you can check the quality of the sounds it’s producing. After listening, your Samsung TV will ask you if the sound quality it played is okay or not.
If you select “No” here, your Samsung TV will display its model code and software version on the screen so you can write it down. You will provide this information to a Samsung customer support agent once you’ve contacted them for some assistance.
We also recommend performing a sound setting reset on your Samsung TV to try troubleshooting the issue yourself. This action will restore the configuration of your Samsung TV’s sound settings to their default values, which should help fix the issue.
Use the Smart Hub to perform a sound test on your Samsung TV.
| Difficulty | Very Easy ●○○○○ |
| Number of Steps | 8 |
| Time to Perform Fix | 30 seconds |
| Things Needed | Samsung TV remote control |
Step 1: Open the Samsung Smart Hub menu on the TV home screen by pressing the home button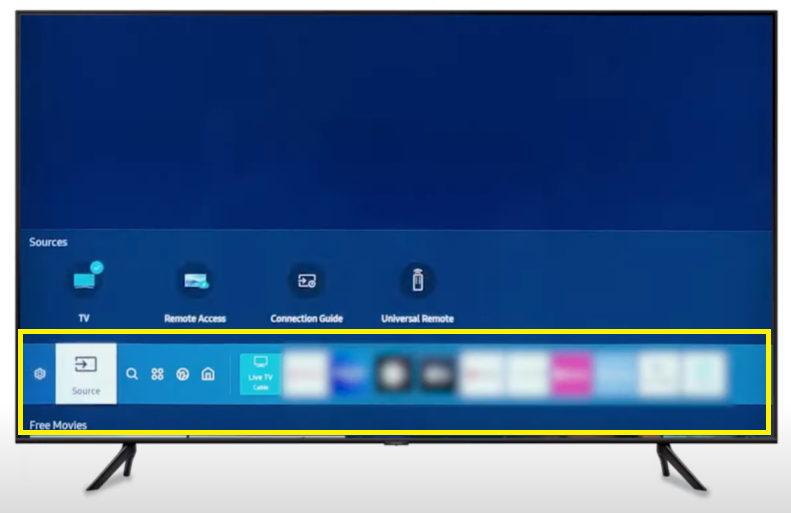 |
Step 2: Scroll left and click Settings from the Samsung Smart Hub menu. |
Step 3: Scroll down and click Support from the system settings menu.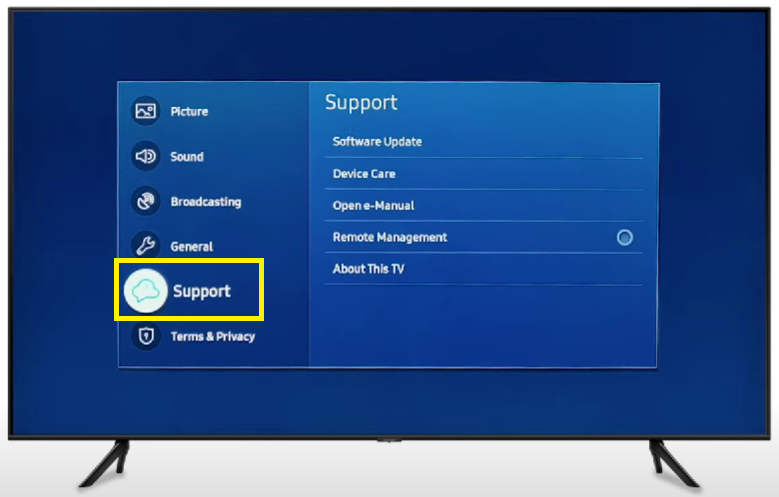 |
Step 4: Scroll down and click Device Care from the support menu.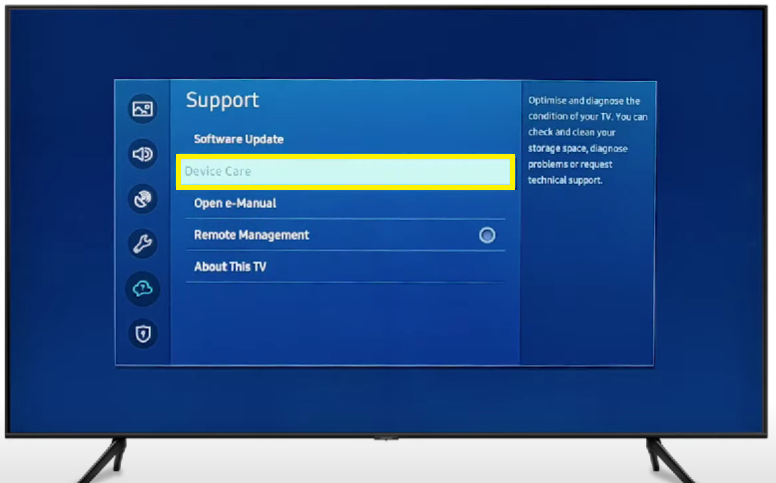 |
Step 5: Select and click Self Diagnosis from the device care menu.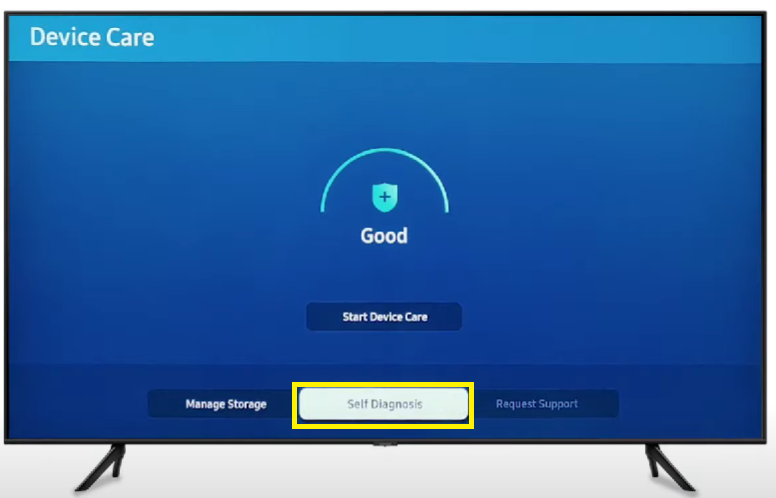 |
Step 6: Select and click Sound Test from the self-diagnosis menu.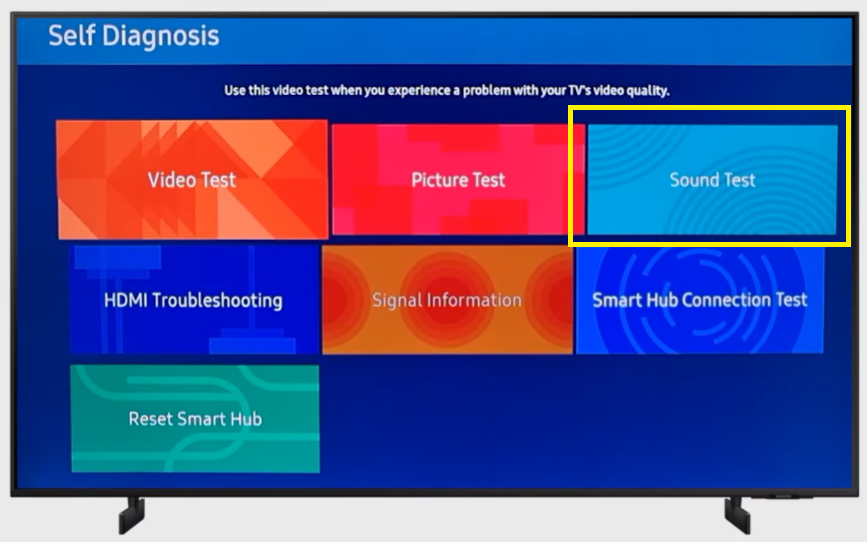 Note: The Samsung TV should play sample audio that you must listen to to judge the unit’s sound quality. |
Step 7: Listen to the sample audio your Samsung TV is playing.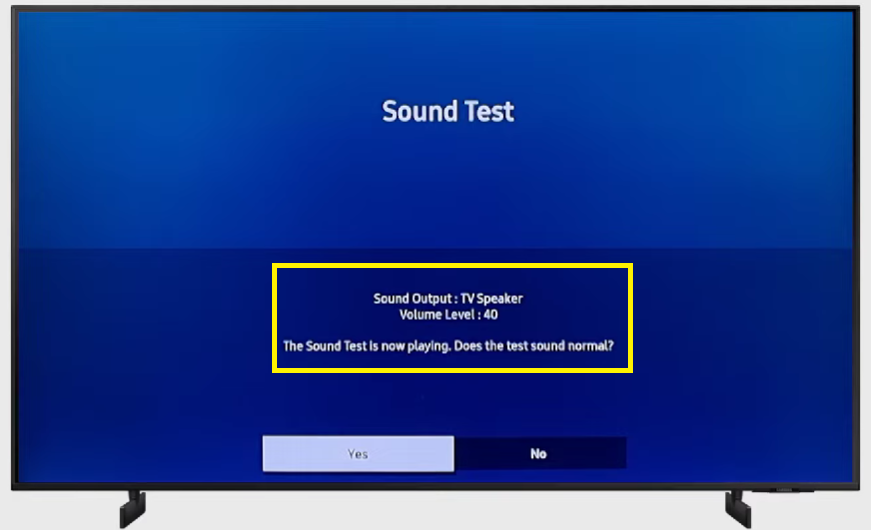 |
Step 8: Select No if the sound quality is terrible or if there’s none at all.Write down the information displayed on the Samsung TV display screen.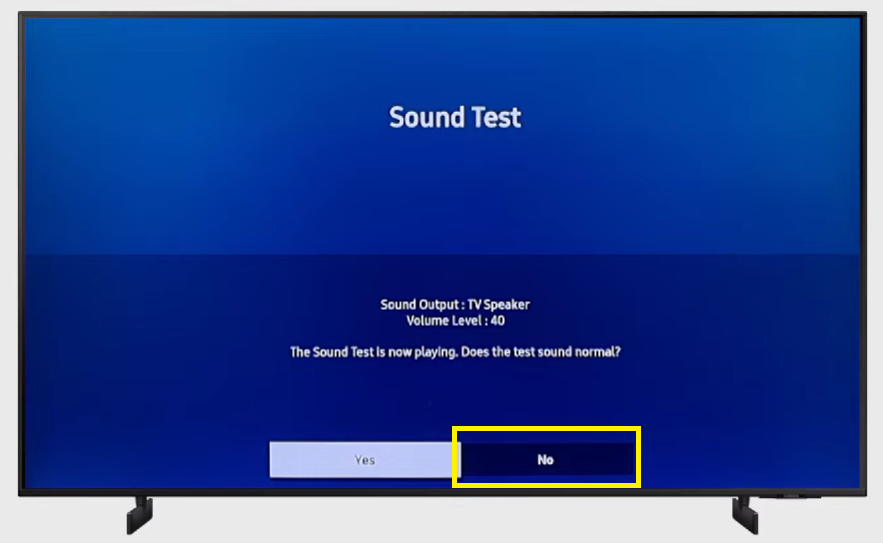 |
After performing the sound test, we suggest contacting Samsung support immediately to assist you with your TV’s sound issue. Otherwise, you can reset your Samsung TV’s sound settings by following the instructions below.
Use the Smart Hub to conduct a sound reset on your Samsung TV.
| Difficulty | Very Easy ●○○○○ |
| Number of Steps | 7 |
| Time to Perform Fix | 30 seconds |
| Things Needed | Samsung TV remote control |
| Step 1: Open the Samsung Smart Hub menu on the TV home screen by pressing the home button |
| Step 2: Scroll left and click Settings from the Samsung Smart Hub menu. |
Step 3: Scroll down and click Sound from the system settings menu.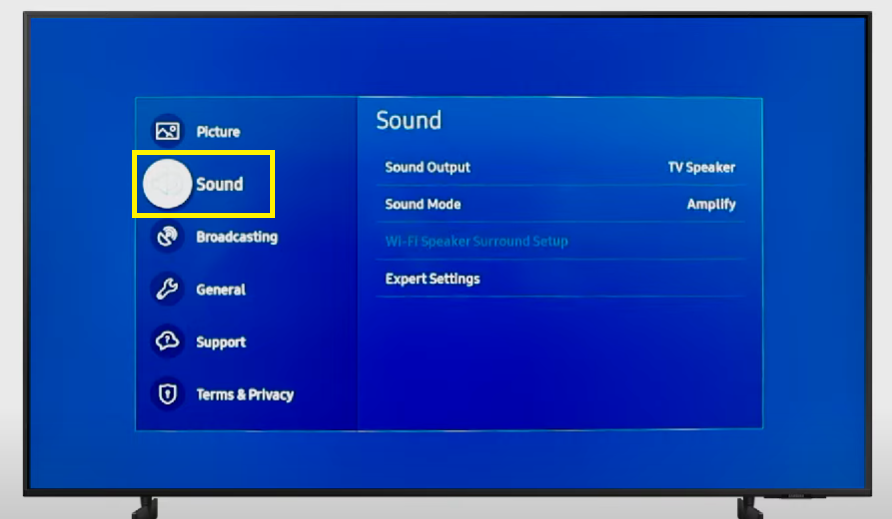 |
Step 4: Scroll down and click Expert Settings from the sound settings menu.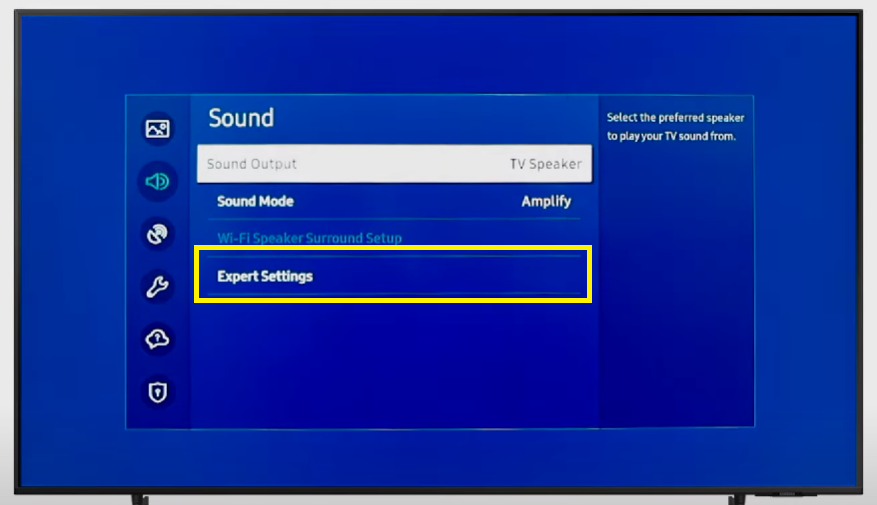 |
Step 5: Scroll down and click Reset Sound from the expert settings menu.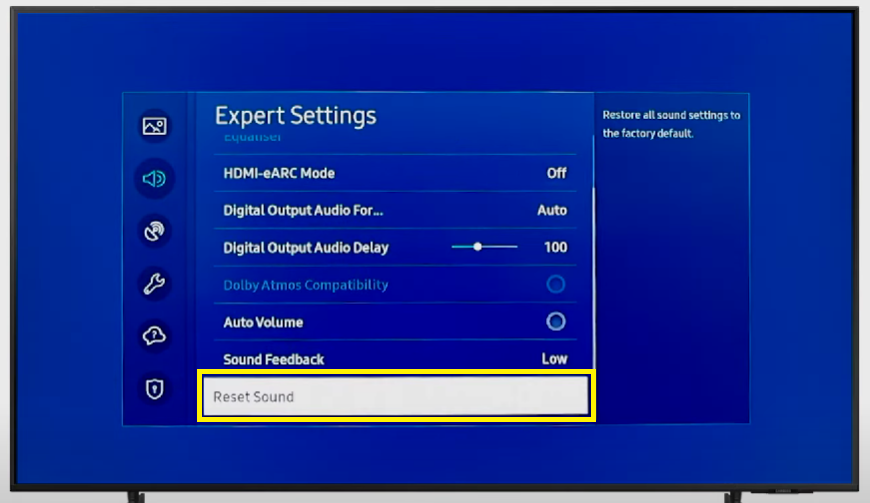 |
Step 6: Select Reset to authorize the Sound Settings Reset.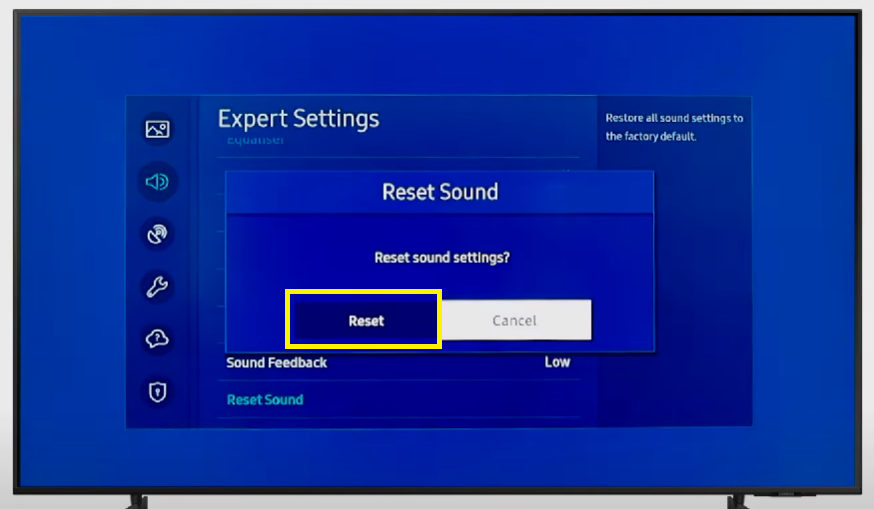 |
Step 7: Look for the confirmation that says, “ The sound settings have been reset.”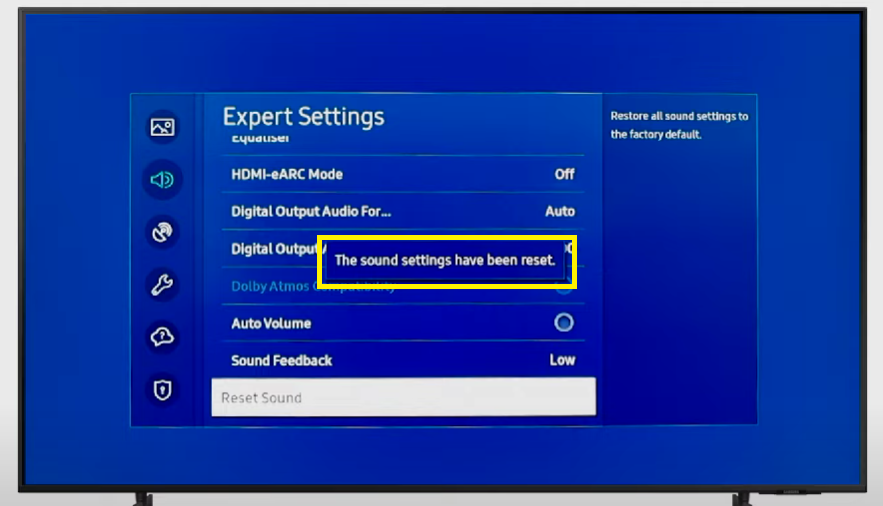 |
3. Set Optical as your Samsung TV’s Sound Output.
| Difficulty | Very Easy ●○○○○ |
| Number of Steps | 5 |
| Time to Perform Fix | 20 seconds |
| Things Needed | Samsung TV remote control |
Another reason that the optical audio port of your Samsung TV isn’t working is because of an incorrect Sound Output selection. If your Samsung TV has its speaker set as the Sound Output, its built-in speaker will still be used instead of your optical audio device.
We recommend double-checking if you’re using the correct Sound Output on your Samsung TV. Sometimes, you only need to pay attention to a simple detail like this, as it’s easy to overlook when setting up your Samsung TV’s sound system.
As such, you need to set the Sound Output to Optical whenever you’re using an audio device that connects to your Samsung TV via the optical audio port. Once it’s set, it should fix the issue with Samsung TV Optical Out not working like normal.
| Step 1: Open the Samsung Smart Hub menu on the TV home screen by pressing the home button |
| Step 2: Scroll left and click Settings from the Samsung Smart Hub menu. |
| Step 3: Scroll down and click Sound from the system settings menu. |
Step 4: Click Sound Output from the sound settings menu.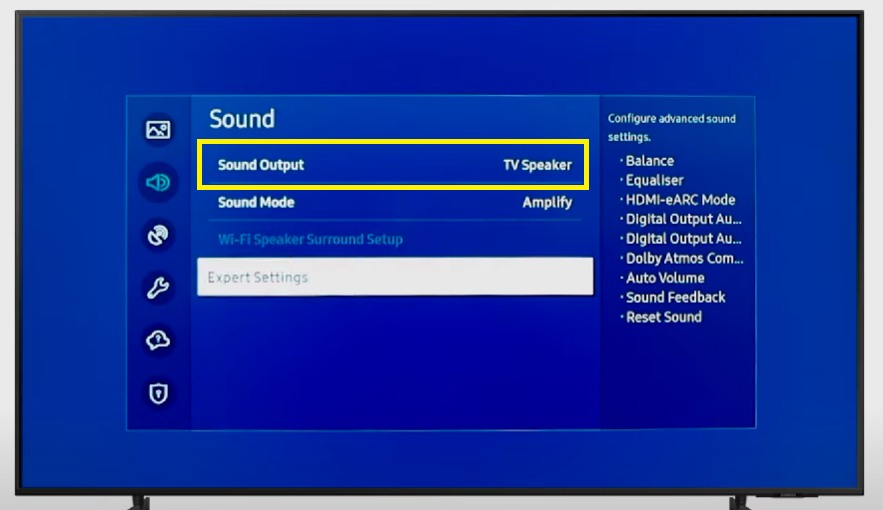 |
| Step 5: Select Optical to set it as your Samsung TV’s Sound Output. |
4. Set PCM as your Samsung TV’s HDMI Input Audio Format.
| Difficulty | Very Easy ●○○○○ |
| Number of Steps | 5 |
| Time to Perform Fix | 20 seconds |
| Things Needed | Samsung TV remote control |
Pulse-Code Modulation (PCM) is one of the most commonly used audio formats for digital audio storage and transmission on Samsung TVs. Unlike Dolby Digital, PCM audio is uncompressed, which helps preserve the quality of the transmitted sound.
It’s the reason we recommend setting the HDMI Input Audio Format of your Samsung TV to PCM instead of Dolby Digital, Bitstream, etc.
After you’ve set PCM as the HDMI Input Audio Format, that should fix the Samsung TV Optical Out not working issue.
Step 1: Open the Samsung Smart Hub menu on the TV home screen by pressing the home button |
Step 2: Scroll left and click Settings from the Samsung Smart Hub menu. |
Step 3: Scroll down and click Sound from the system settings menu.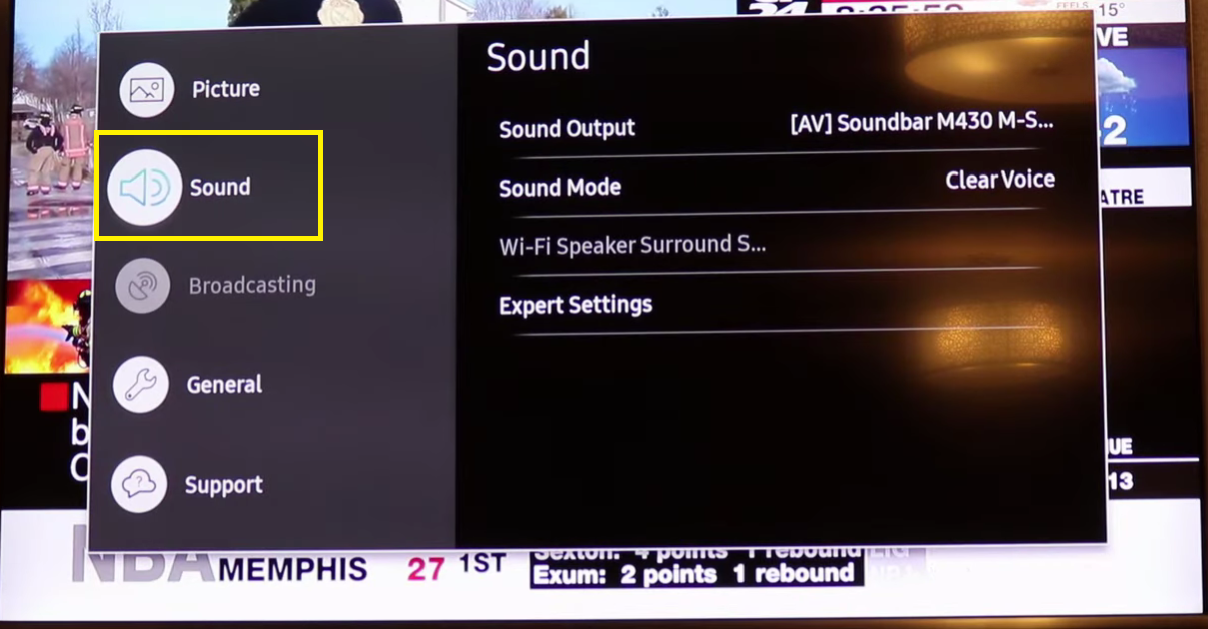 |
Step 4: Scroll down and click Expert Settings from the sound settings menu.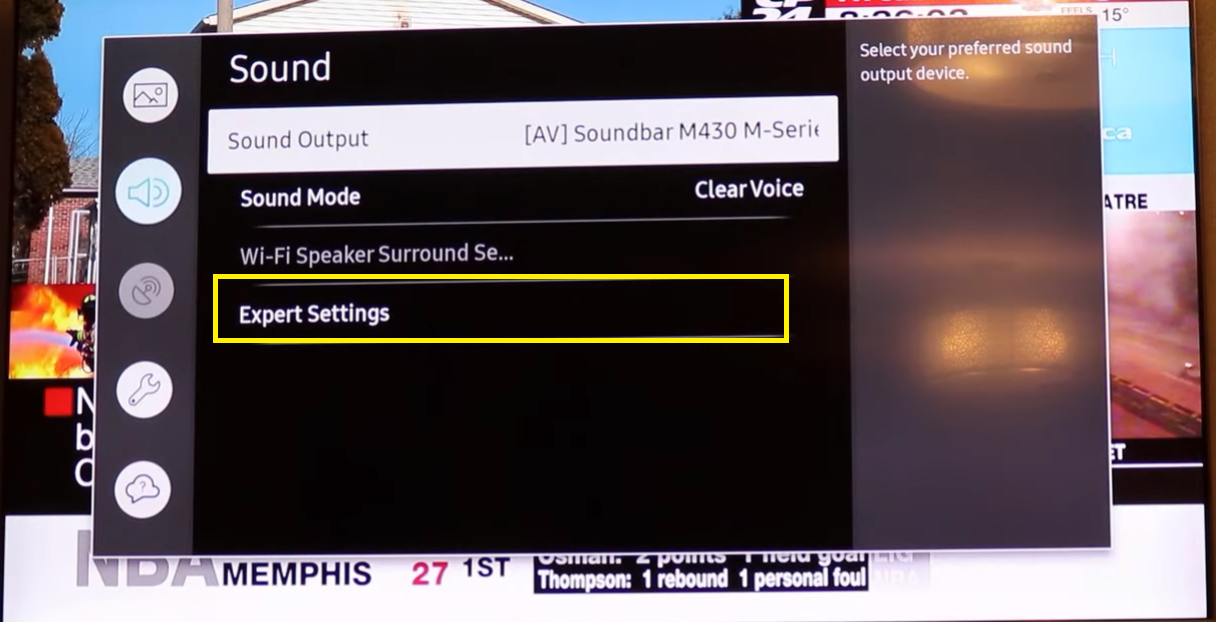 |
Step 5: Select and click HDMI Input Audio Format from the expert settings menu.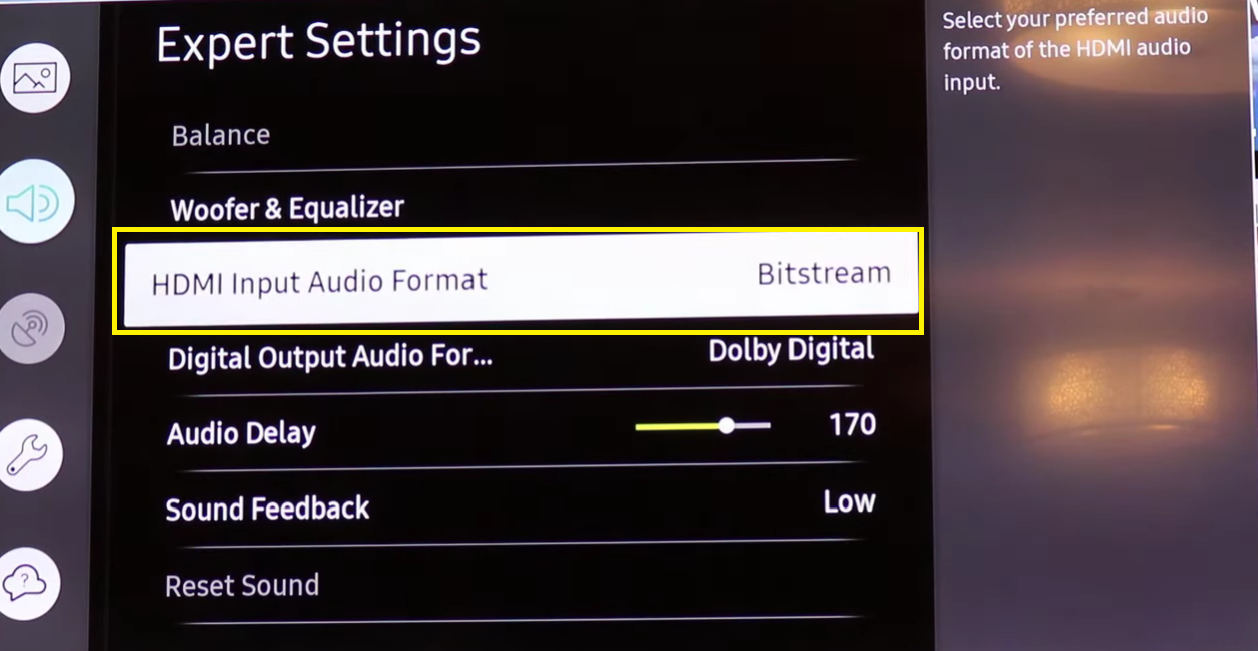 |
| Step 6: Select PCM to set it as your Samsung TV’s HDMI Input Audio Format. |
5. Set PCM as your Samsung TV’s Digital Output Audio Format.
| Difficulty | Very Easy ●○○○○ |
| Number of Steps | 5 |
| Time to Perform Fix | 20 seconds |
| Things Needed | Samsung TV remote control |
Aside from the HDMI Input Audio Format, we also recommend setting the Digital Output Audio Format of your Samsung TV to PCM.
Doing so will require more storage space when transmitting and storing data, but the sound quality you get on your TV is better.
Setting the Digital Output Audio Format to PCM also helps fix the issue with Samsung TV Optical Out acting up. We suggest performing this method whenever you’re having trouble with an audio device connected to your TV’s optical audio port.
Step 1: Open the Samsung Smart Hub menu on the TV home screen by pressing the home button |
Step 2: Scroll left and click Settings from the Samsung Smart Hub menu.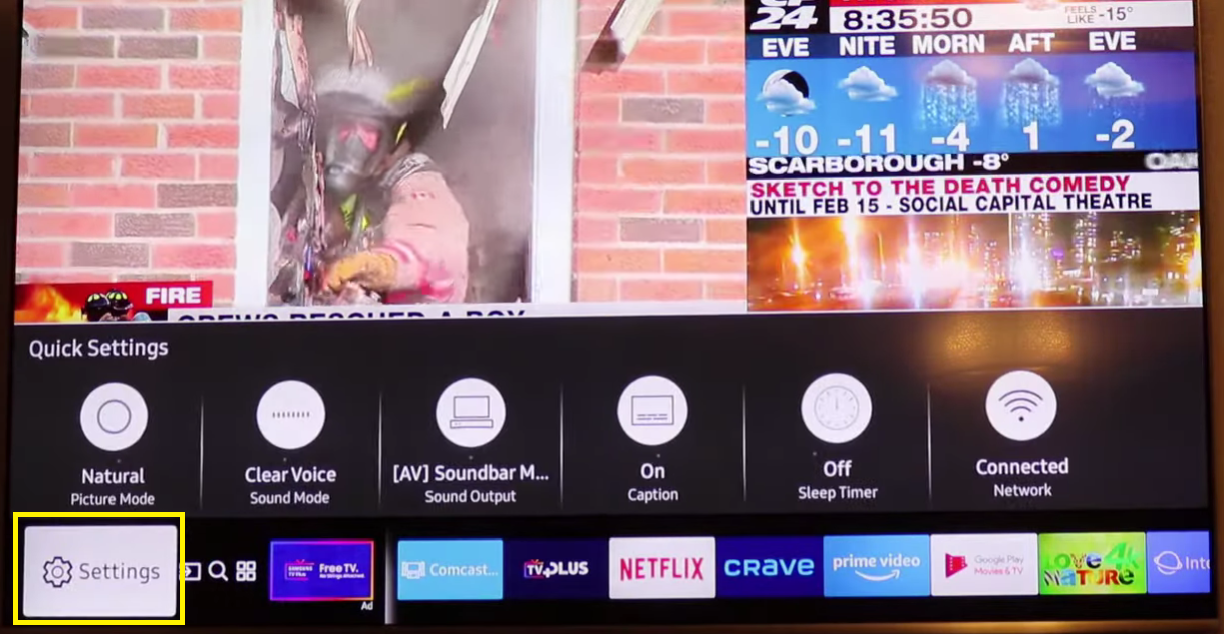 |
Step 3: Scroll down and click Sound from the system settings menu. |
Step 4: Scroll down and click Expert Settings from the sound settings menu. |
Step 5: Scroll down and click Digital Output Audio Format from the expert settings menu.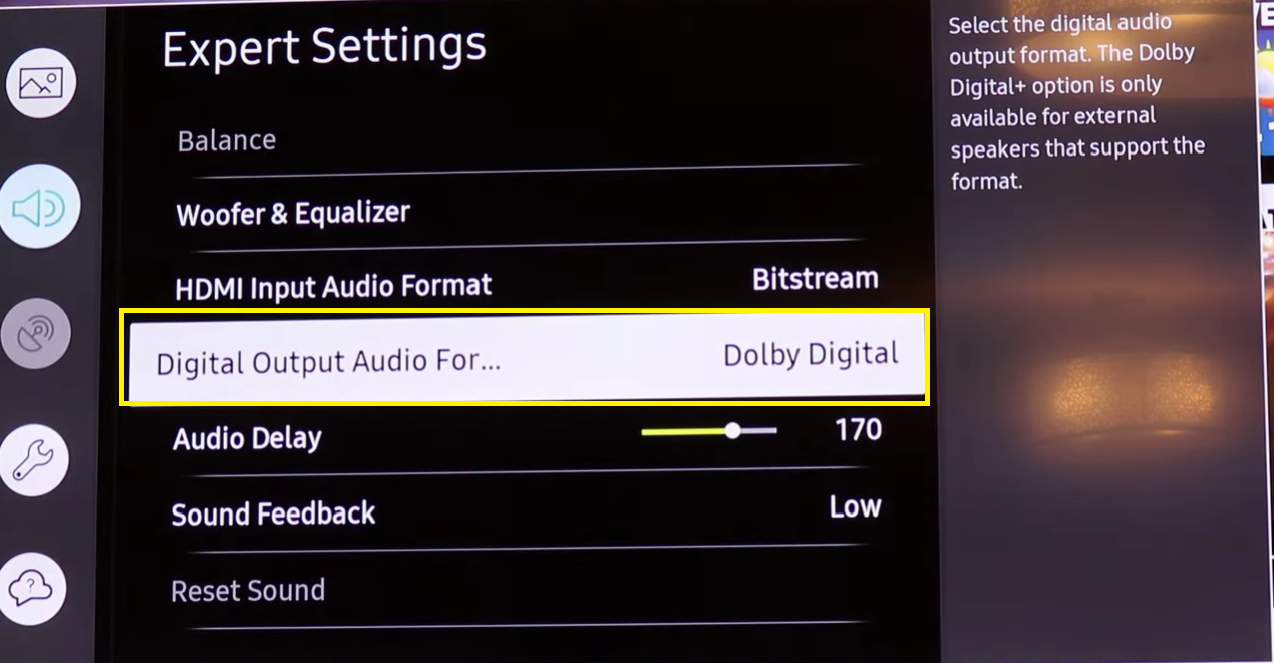 |
| Step 6: Select PCM to set it as your Samsung TV’s Digital Output Audio Format. |
6. Factory reset Samsung TV.
| Difficulty | Very Easy ●○○○○ |
| Number of Steps | 8 |
| Time to Perform Fix | 5 minutes |
| Things Needed | Samsung TV remote control |
We recommend treating this final method as your last resort in case the solutions we’ve provided couldn’t resolve your Samsung TV’s sound issue. This is because performing a factory reset on your Samsung TV has some downsides.
| WARNING: A factory reset deletes your saved data (e.g., downloaded apps) and TV preferences. It’s best to save a copy of these files before you start the process. |
This reset process will delete your account data, installed apps, system settings, and network settings from your Samsung TV. As such, we highly suggest going through with the factory reset if this is your only remaining recourse.
Fortunately, the factory reset itself is the most effective way to resolve software-related problems that might be causing the Samsung TV Optical Out not working issue. If none of the previous solutions worked for you, this might finally resolve the problem.
Step 1: Open the Samsung Smart Hub menu on the TV home screen by pressing the home button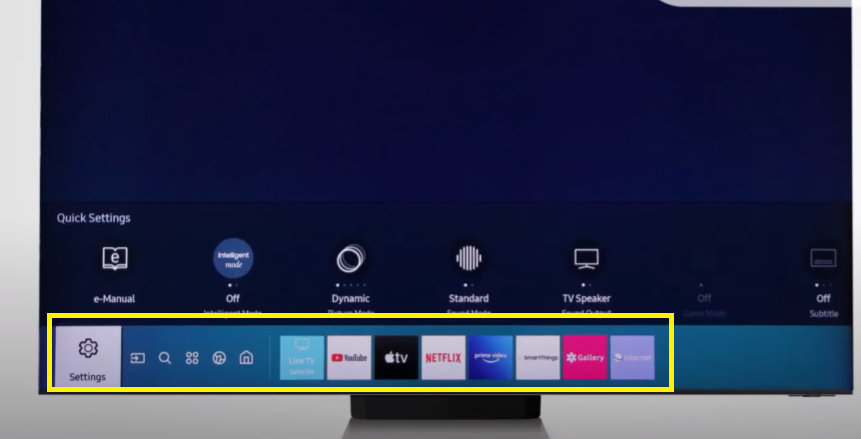 |
Step 2: Scroll left and click Settings from the Samsung Smart Hub menu.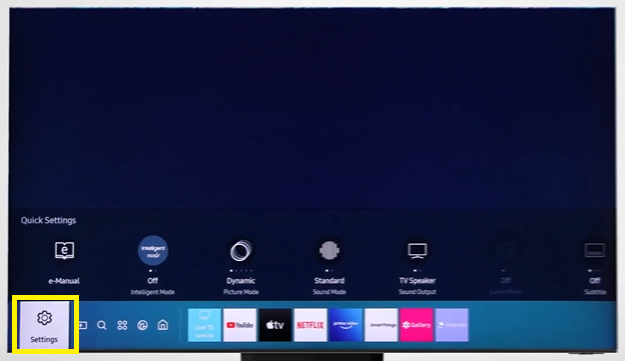 |
Step 3: Scroll down and click General from the system settings menu.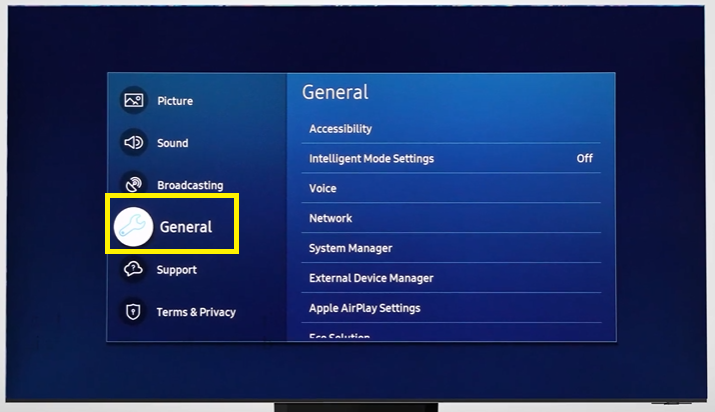 |
Step 4: Scroll down and click Reset from the general settings menu.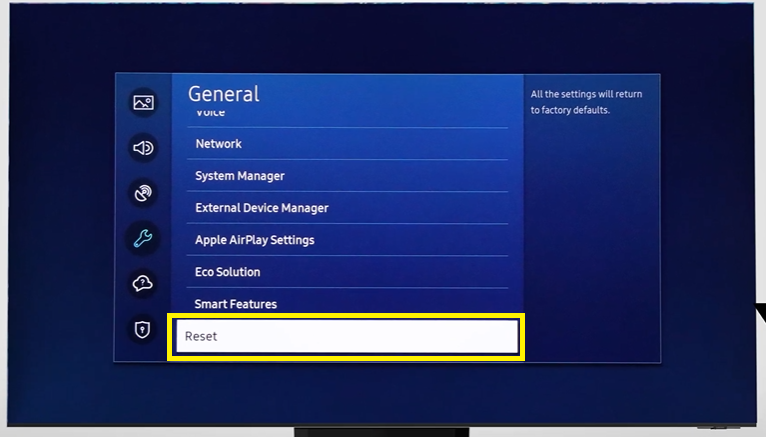 |
Step 5: Enter the PIN passcode of the Samsung TV and hit Done to proceed.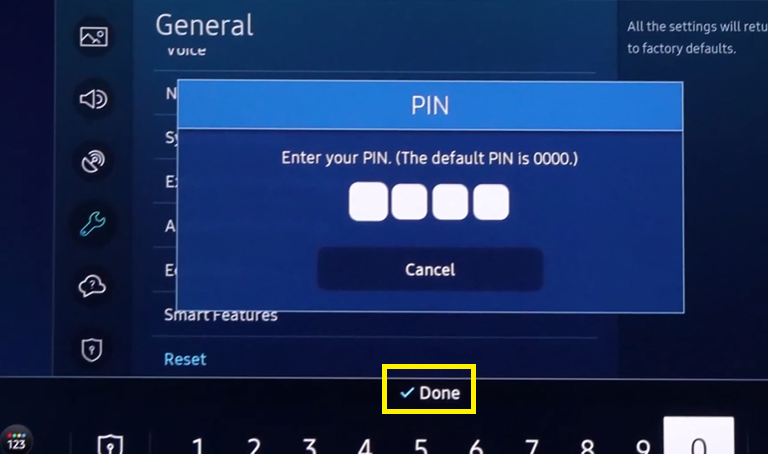 |
Step 6: Select Yes on the small pop-up window. |
| Step 7: Wait while your Samsung TV performs a factory reset and reboot sequence. |
Step 8: Set up and configure the Samsung Smart Hub on your TV. 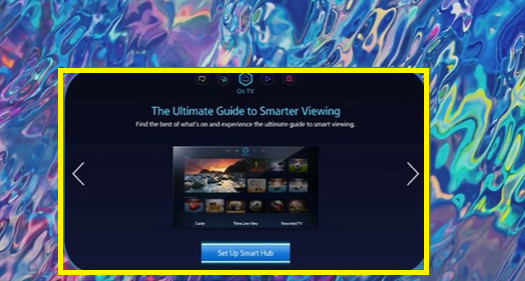 |
What to Do If There’s No Sound after Setting Optical as the Sound Output
Several methods can resolve the issue with the Samsung TV Optical Out acting up after the Sound Output has been set to Optical. Below is a list of things you can try if changing your Samsung TV’s Sound Output didn’t fix the issue.
1. Conduct a Samsung TV power cycle.
| Difficulty | Very Easy ●○○○○ |
| Number of Steps | 3 |
| Time to Perform Fix | 1 minute and 15 seconds |
Conducting a power cycle on your Samsung TV is the most effective way to discharge any residual electrical energy that might be the root cause of its problems.
Take note this is not your regular on/off procedure. Unlike a simple reboot process, power cycling requires you to also hold the TV’s power button.
Doing so will discharge the residual electrical energy stored on your Samsung TV. After thirty seconds, you can plug the unit back into the power socket to reintroduce electricity into its system and fix the Samsung TV Optical Out not working issue.
| Step 1: Force shut down your Samsung TV by unplugging its power cable from the power socket. 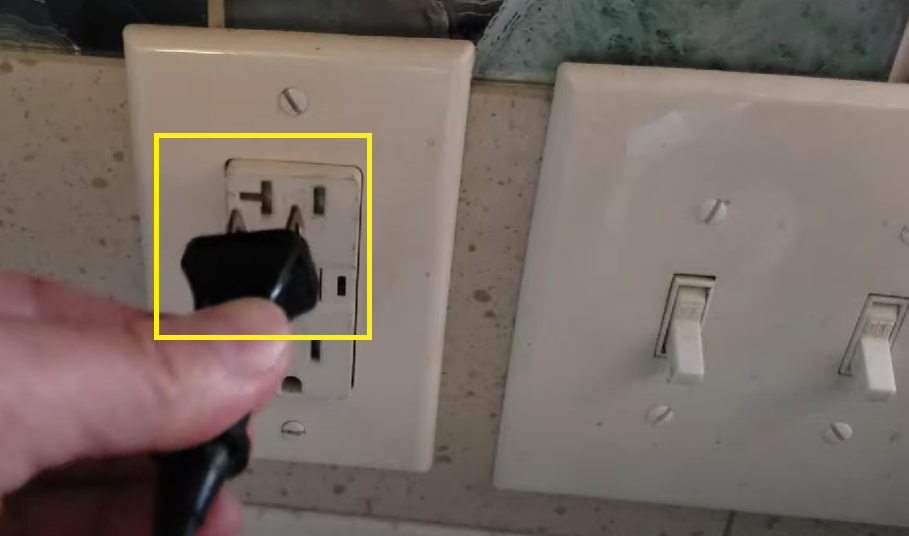 |
Step 2: Press/hold your Samsung TV’s power button for 30 seconds to eliminate all of its residual electrical energy.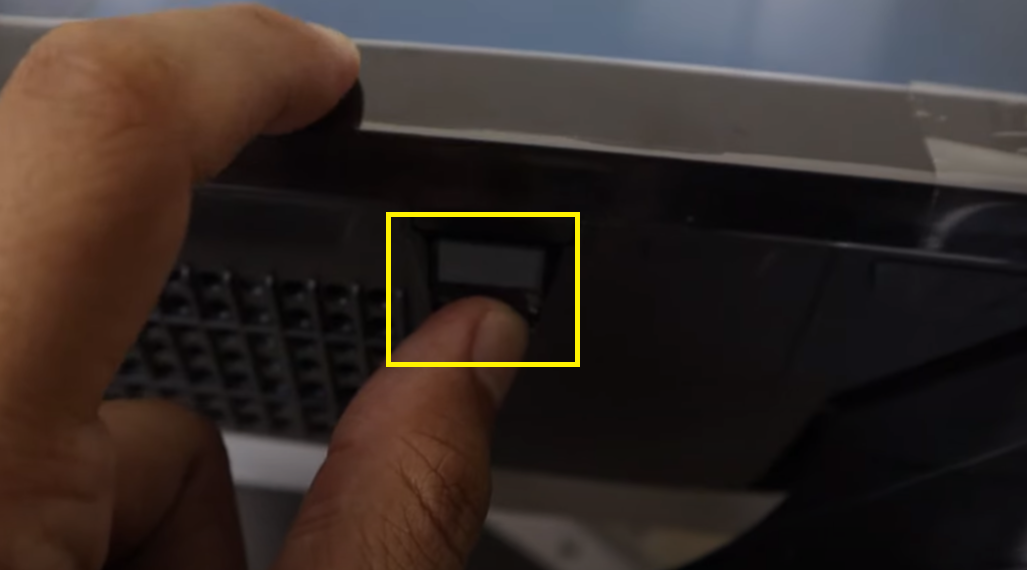 Note: You can locate the power button of your Samsung TV by checking its underside, left/right side, or rear panel. We suggest checking out its user manual if you can’t find the power button in these locations. |
Step 3: Release your Samsung TV’s power button and leave it for 30 more seconds. Plug its power cable back into the power socket to turn on the Samsung TV.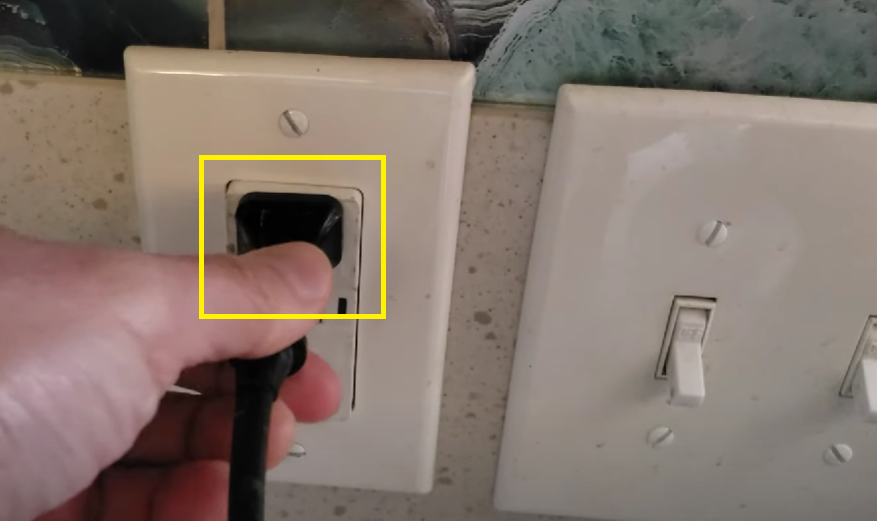 Note: You can press the power button of your Samsung TV or its remote control if it doesn’t automatically turn on after the power cable is plugged in. |
2. Check the optical audio ports.
| Difficulty | Very Easy ●○○○○ |
| Number of Steps | 1 |
| Time to Perform Fix | 10 to 20 seconds |
| Things Needed | A can of compressed airCotton swabs |
We also recommend checking the optical audio ports on your Samsung TV and the audio device if there’s still no sound after setting Optical as the Sound Output. The optical audio ports on both devices might have some dust or dirt buildup inside.
If this is the case, that would explain why your Samsung TV isn’t producing sound since the audio transmission is blocked. You’ll need to clean the insides of the optical audio port to remove the dirt or dust particles.
You can blow air into the port to remove the dust particles from the optical audio port. You can also use a cotton swab to thoroughly wipe inside your Samsung TV and the optical audio ports.
3. Test your optical audio cables.
| Difficulty | Very Easy ●○○○○ |
| Number of Steps | 1 |
| Time to Perform Fix | 10 seconds |
| Things Needed | Replacement optical audio cable |
It’s always advisable to test your optical audio cables to make sure that they’re in great working condition. Test your optical audio cable using a visual fault locator (VFL) or switching between your spare cables to identify which ones aren’t working.
You can also inspect the wire of your optical audio cable to see any signs of damage. Wear and tear are common on cables, and it will cause them to no longer transmit any data reliably.
If your optical audio cable is already damaged, you can replace it with a spare or a newly bought cable.
How to Test Your Optical Audio Cable
A VFL tool can be used to test and identify faults on your optical audio cable. This tool uses high-intensity laser light to locate any fault in the optical audio cable by tracking where its continuity breaks.
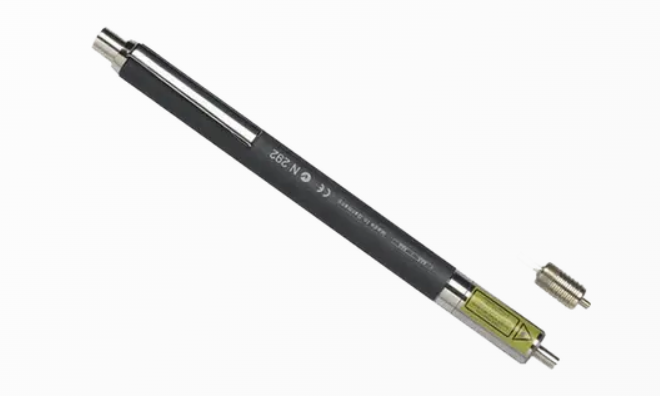
If there are any breaks on your optical audio cable, you will see the right light from the VFL tool glowing at the part where the damage is located. Safety is paramount when using a VFL tool, as its light source is dangerous to the naked eye.
Alternatively, you can instead just test your optical audio cable by switching to other cables you have to identify which of them are operational. It’s also safer and more practical to just get a replacement cable instead of investing in a VFL tool.
FAQs about Samsung TV and Optical Out
What causes the Optical Audio to not work on my Samsung TV?
Various factors can cause the Optical Audio to not work on your Samsung TV. Below is a rundown of the most common causes of known Optical Audio failures on Samsung TVs.
- Having misconfigured sound settings on your Samsung TV.
- Having dust or dirt buildup inside the optical audio ports of your devices.
- Setting the incorrect Sound Ouput on your Samsung TV.
- Setting the incorrect HDMI and Digital Audio Format on your Samsung TV.
- Using a faulty optical audio cable.
- Using an outdated software version on your Samsung TV.
How do I conduct a Samsung TV software update?
Navigate to Settings > Support > Software Update to check the internet for any available software updates for your Samsung TV. You can also head to the Manuals & Software page of Samsung to download the software update on your PC.
Once the software update is downloaded on your PC, copy it to a USB stick. You can then plug the USB stick into your Samsung TV to manually update its software version.
How much is a replacement optical audio cable for my Samsung TV?
Optical audio cables cost $5 – $15 if bought from online selling platforms such as Amazon. We recommend buying optical audio cables that come in pairs so you have a spare to use in case there’s a problem with one cable.
How much does a VFL tool for testing optical audio cables cost?
VLF Pens can cost $15 – $150 depending on the range and power of their light source.
If you only want to use it for testing your optical audio cables, get the cheaper ones since most optical audio cables used on Samsung TVs are usually 1 – 3 meters.