
If your Samsung Galaxy M series phone fails to boot up, running to a Samsung repair shop should be your last resort. Far too often, booting issues are minor — something you can solve without throwing a fortune.
A firmware issue or an errant app usually causes smartphones to get stuck in the booting process. But there are proven ways to fix the booting issue on a Samsung device, like hard rebooting and resetting.
We’re detailing 5 of these methods below – complete with how much time, effort, and money you would need to get each done. This step-by-step guide comes with pictures, so you won’t have to bend over backward to get your unit working!
How to Fix the Booting Issue on Samsung Galaxy M Series
Without further ado, here are the most common quick fixes to get your Samsung smartphone caught up in the booting process back to action.
1. Do a hard reboot.
| Degree of difficulty: | Easy |
| Approximate time needed: | 3 to 5 minutes |
| Possible $$ needed: | $0.00 |
Some may call it a restart but think of a hard reboot on your Samsung phone (and any smartphone, for that matter) as shutting down your PC or laptop. What this does is it frees up the RAM — a panacea to solve many app issues.
It’s no accident. Forcing a reboot should be your first course of action.
More often than not, performance issues on smart devices boil down to one particular thing as you use one app after another: RAM over usage. A hard reboot clears out the RAM remedying the problem.
There are two ways to do a hard reset. The first is through the power button, and the other is a bit more drastic as you would have to disconnect the battery from the unit.
Here’s how to hard reboot your Samsung device using the power button:
- Press, then hold the Power and Volume Down Button at the same time.
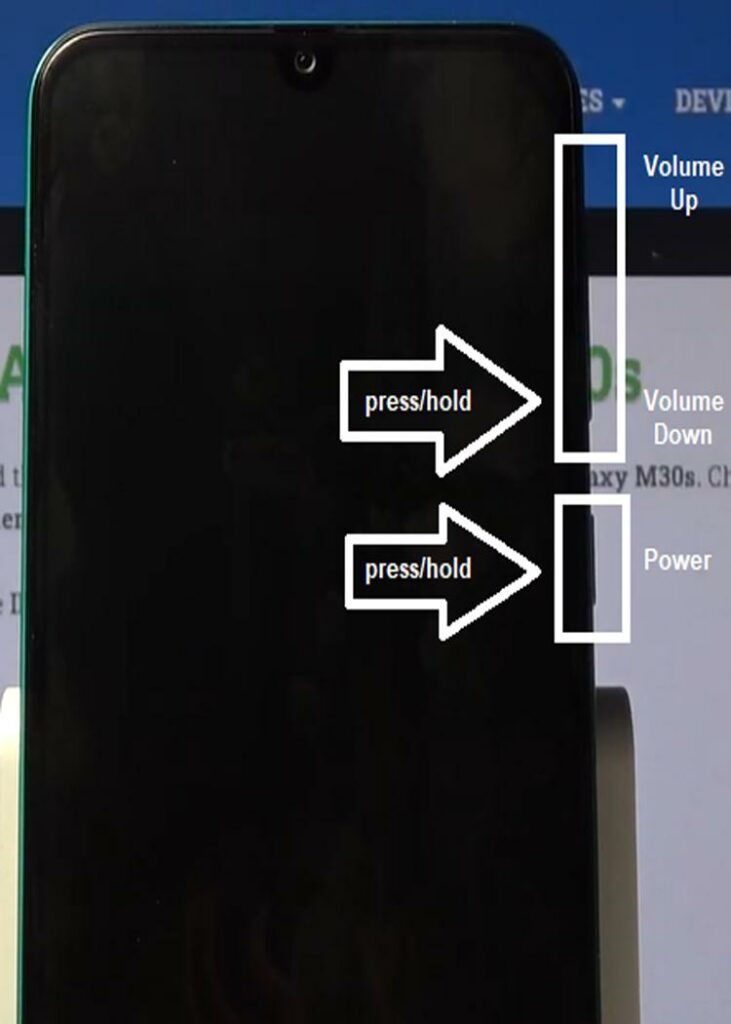
- Keep holding until you see the Samsung logo.
- Allow the restart process to finish.
After a successful reset, your phone should boot up completely, and you should be able to use the smart device as usual. If not, you should move forward and learn how to fix the booting issue on Samsung via other means.
If your phone has a faulty volume button, or if, for some reason, they won’t work right now, you can try the second option. It’s a more direct approach and involves manually disconnecting the battery.
You don’t need to remove the entire battery, just disconnect the battery’s ribbon cable and plug it back in. Then, put everything back together, turn your phone on, and see the magic unfold before your very eyes.
It’s not original, as it’s similar to how batteries were taken out to reboot old mobile phones. But with the right set of tools and an easy-to-follow guide, this should be a walk in the park.
2. Reboot your phone in Safe Mode.
| Degree of difficulty: | Moderate |
| Approximate time needed: | 10 to 15 minutes |
| Possible $$ needed: | $0.00 |
Another possible cause for why your Samsung M series is not booting up is a faulty third-party app. Fortunately, rebooting your smart device in Safe Mode will tell you if this is the case.
While in safe mode, third-party apps won’t be able to run on your phone. Simply put, if you can reboot your phone in Safe Mode, your problem is highly likely third-party apps, as native Samsung apps are working as intended.
Here’s how to enter Safe Mode:
- Press, then hold the Power and Volume Down buttons to soft reset.
- Keep holding both buttons until the Samsung logo appears.
- Release the Power button if you see the logo.
- Keep holding down the Volume Down button as it boots up.
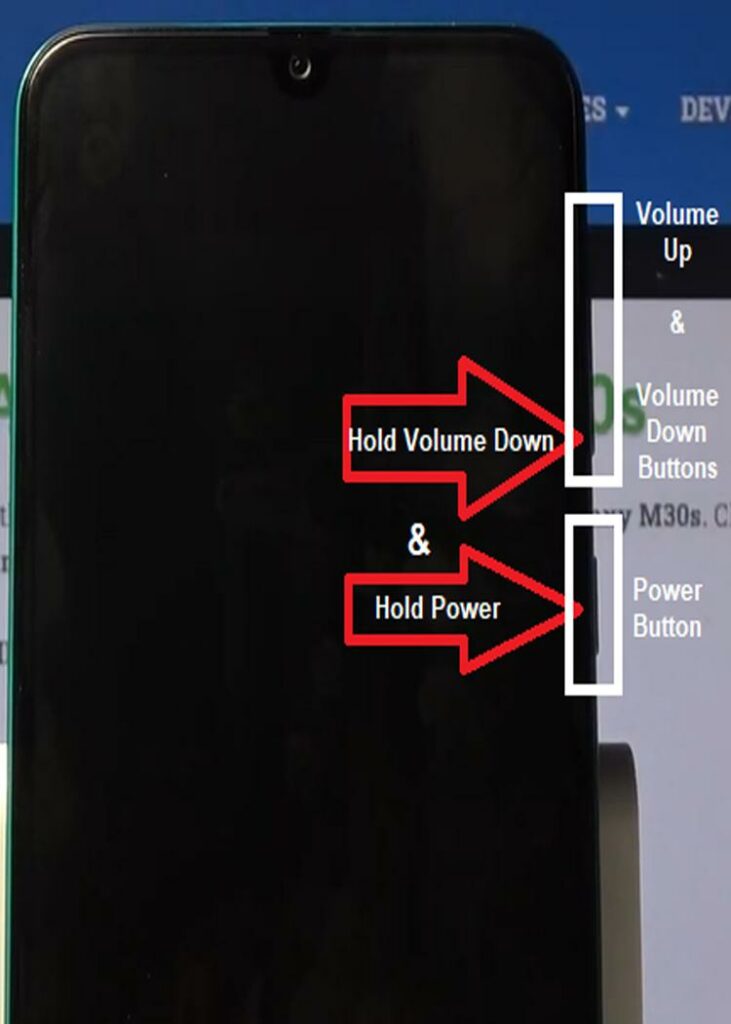
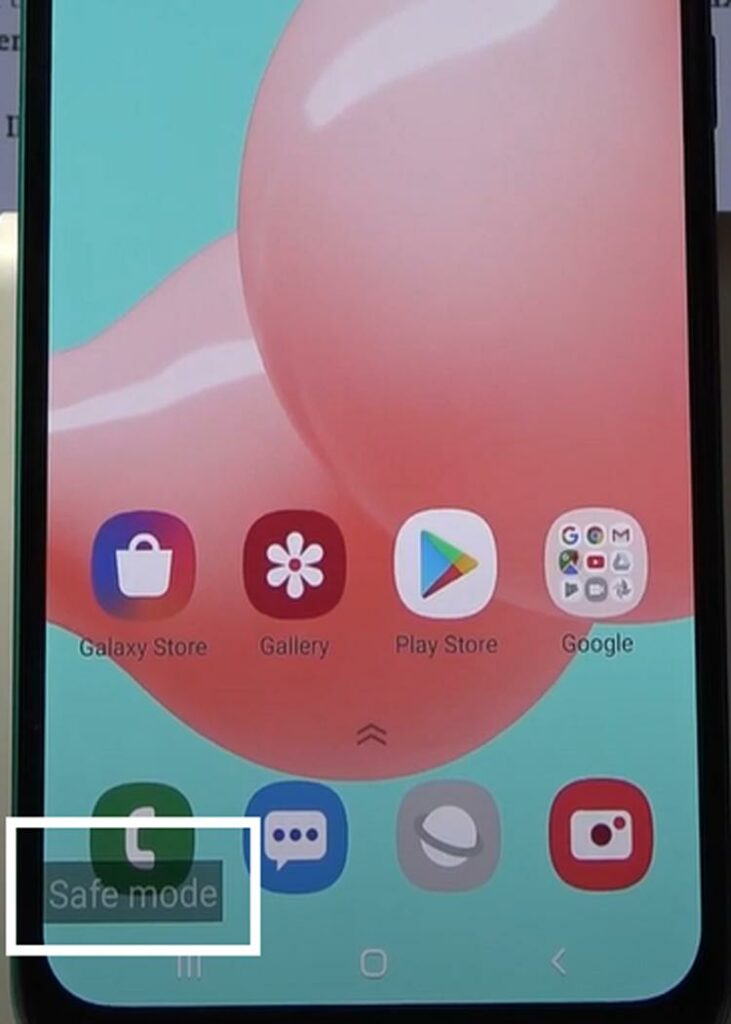
- If successful, Safe Mode should appear in the bottom left corner of the screen. If it does not appear, do the steps again.
If your phone was able to boot up in Safe Mode, then the cause of the problem is a third-party app. So from here onwards, uninstall all recently downloaded apps until the problem is solved.
Here are the steps in uninstalling an app:
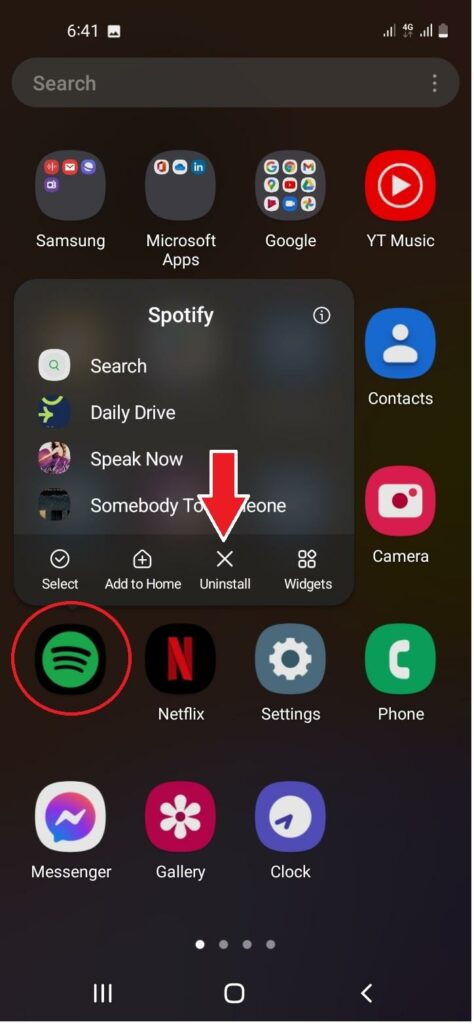
- In the Home Screen, swipe up to open the App Tray.
- Locate the app icon on your phone.
- Hold down on the app icon until a window option appears.
- Tap Uninstall to initiate the uninstallation process.
- Confirm if prompted.

After you’ve made the most of Safe Mode, you need to exit it to be able to use your Samsung in Normal Mode.
Here’s how to exit Safe Mode:
- Press the Power button.
- Hold the power button down until the Power off, Restart, and Emergency mode option appears.
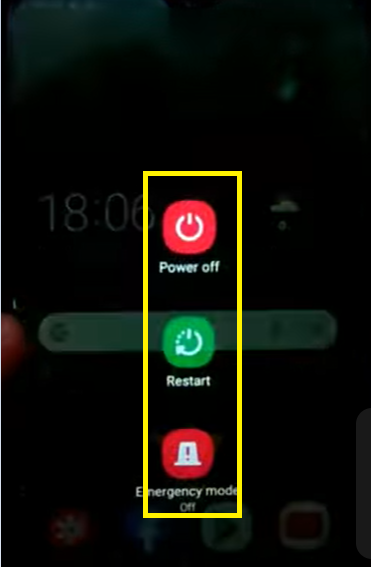
- Tap Restart and wait for it to boot back up.
If Safe Mode fails to boot up and you’re stuck in the Samsung logo, the issue isn’t because of an app. Instead, your phone might have a firmware or hardware problem.
3. Factory reset the phone.
| Degree of difficulty: | Moderate |
| Approximate time needed: | 15 to 20 minutes |
| Possible $$ needed: | $0.00 |
If you still haven’t found a solution to fix the booting issue on your Samsung M series phone, then a more sweeping action has to be taken. This part is where a factory reset should be timely.
Factory reset, also dubbed as master reset, restores the device to the original state when it leaves the factory. This is a drastic solution as all user-added data on your phone–from settings to apps to personal data–will be erased.
With that said, you should be wary about losing your data before doing a factory reset. If you need to, transfer vital information to cloud storage.
Here are the steps to initiate a master reset:
- Use the Power and Volume Down button combination to shut down the device.
Note: You can also wait for it to run out of battery.
- Connect your phone to a PC using its USB cable.
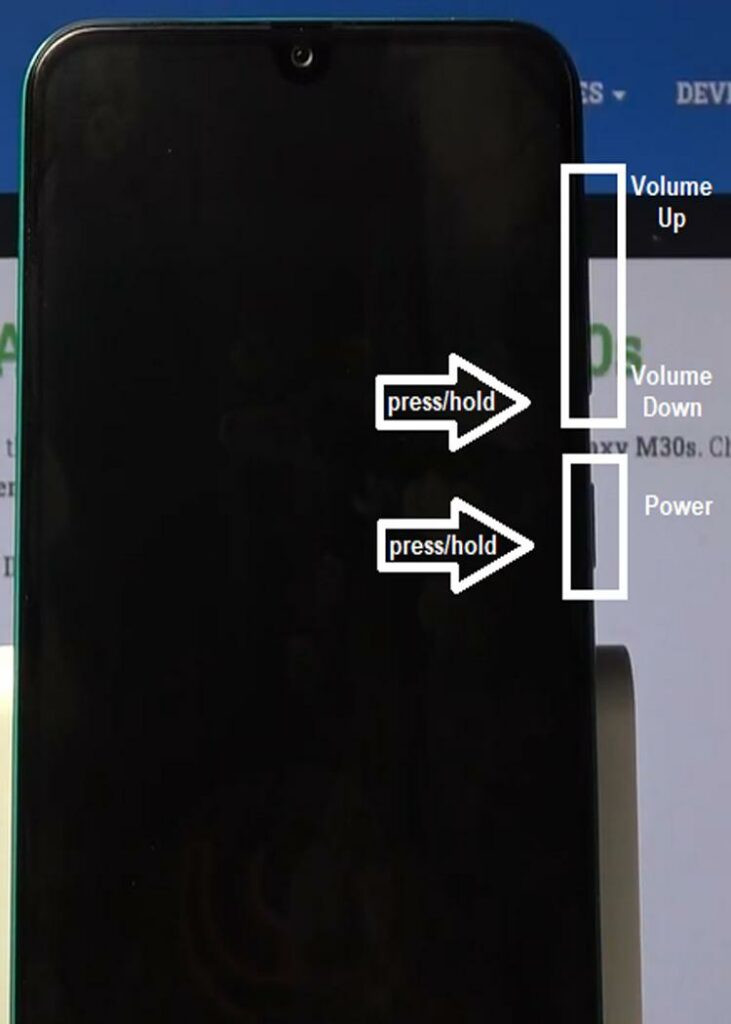
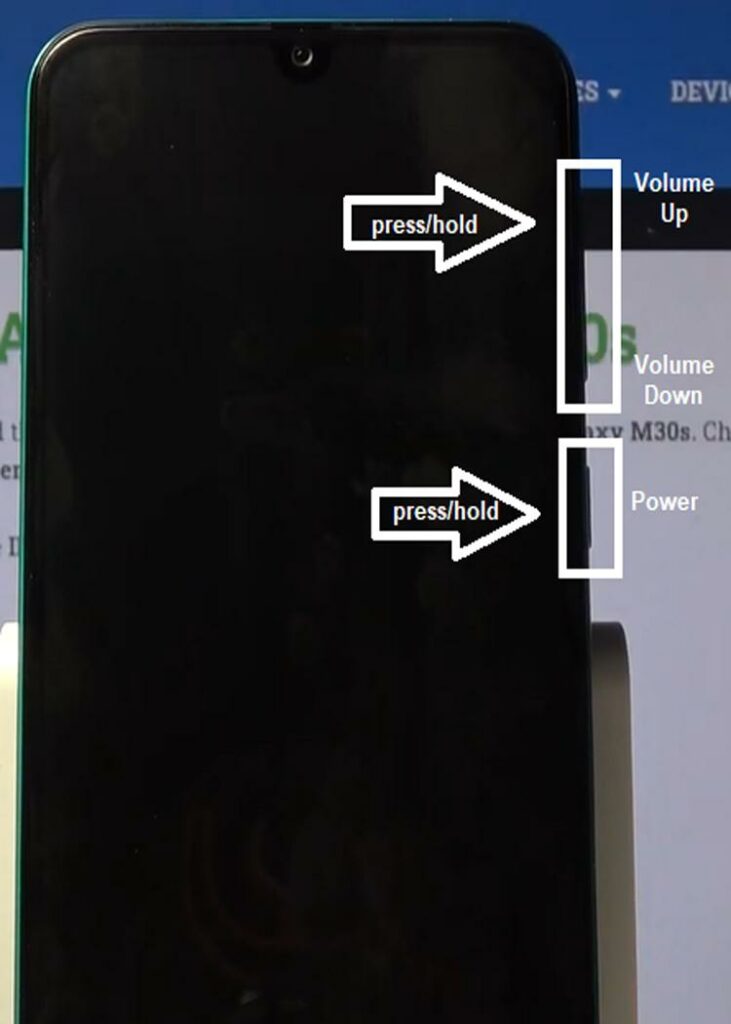
- Press and hold Volume Up and Power buttons to boot into Recovery Mode.
- Use the Volume Down button to highlight Factory reset data/Wipe data.
- Confirm using the Power button.
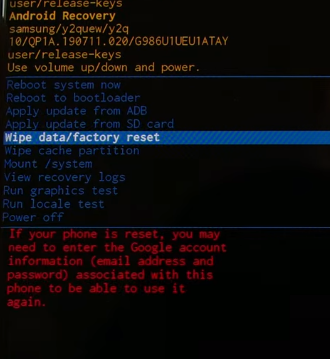

Wait for the process to finish. Pretty soon, your device should be back to normal working condition.
If not, then proceed with the other method.
| NOTE: Google Device Protection may require you to provide your Google account information to use your phone again. |
4. Use Odin to flash the Samsung Galaxy stock firmware.
| Degree of difficulty: | Challenging |
| Approximate time needed: | 30 to 45 minutes |
| Possible $$ needed: | $0.00 |
Now, let’s take care of faulty firmware. By definition, firmware is a manufacturer-installed software that enables your smartphone hardware to run.
The Odin software is Samsung’s code used to flash the latest firmware on Samsung phones. It is typically used to update your phone’s stock firmware, but you can also use it to flash custom Android firmware.
Flashing is the process of changing a device’s firmware. Using Odin allows you to replace corrupt firmware, master how to fix the booting issue on the Samsung Galaxy M series, and go over the hump.
Since Odin is an official tool from Samsung, your phone will allow it to load the files needed to flash your firmware once connected through download mode.
| WARNING: Any mistake while using Odin may cause permanent damage to your phone. The steps are a bit technical so study the method well or skip it altogether if you’re not confident in your abilities. |
You will have to use a PC or a laptop and prep it for the process to work out fine. Basically, there are four steps involved.
Part 1: Prep your computer.
This method requires you to have access to a Windows computer to connect your Samsung phone via a USB cable.
- Download the latest Odin flasher here.
- Extract the zip file in your computer.
- Download and install the latest Samsung Android USB Drivers from Samsung’s developer website.
- Download and extract Samsung Firmware Downloader from here. (for this guide we will download “Bifrost_Windows” because we’re using a windows computer).
Part 2: Download your phone’s firmware.
- Open the Bifrost.exe file you downloaded to launch Samsung Firmware Downloader on your windows computer.
- Input your phone’s model and Country Specific Code (CSC) in the Model and Region text fields.
- Check for updates.
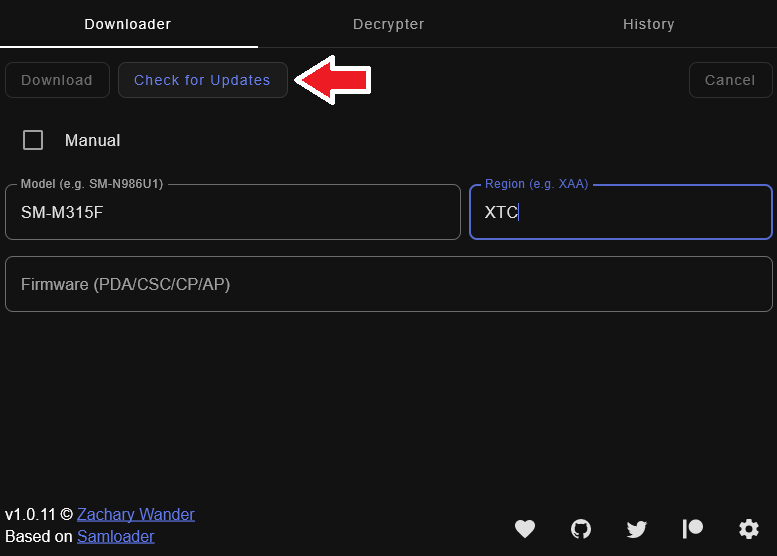
- Follow the format for the model.
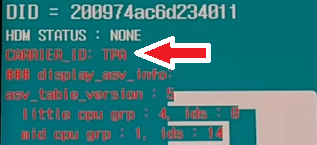
Note: The CSC is a three-letter code. To know your phone’s CSC, you can boot Download Mode on your Samsung device, and it will be written as Carrier_ID: TPA (The three-letter code in this example is the CSC).
- Click Download and choose the location to put the firmware file in after the download.
Part 3: Boot Downloader Mode on your Samsung device
- Open Device Manager on your computer.

- Shut down your phone completely.
- Connect your phone and computer using a USB Cable.
- Press, then hold down the Volume Up and Volume Down buttons simultaneously.
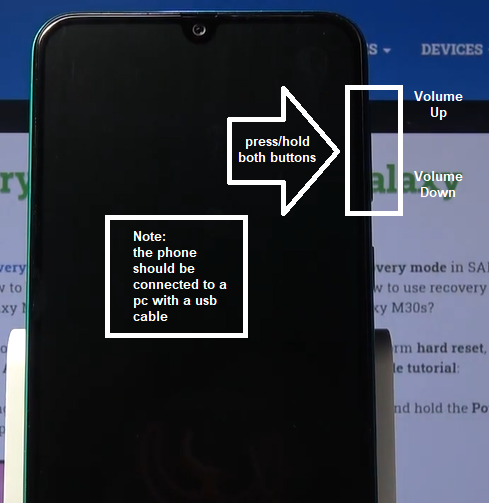
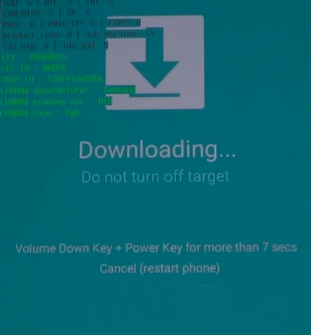
- If you did it correctly, your phone’s screen should display a large download icon.
- Pay attention to the instructions and press the necessary button to continue to Download Mode.
Part 4: Use Odin to flash new firmware.
- Launch Odin by running its .exe file as administrator.
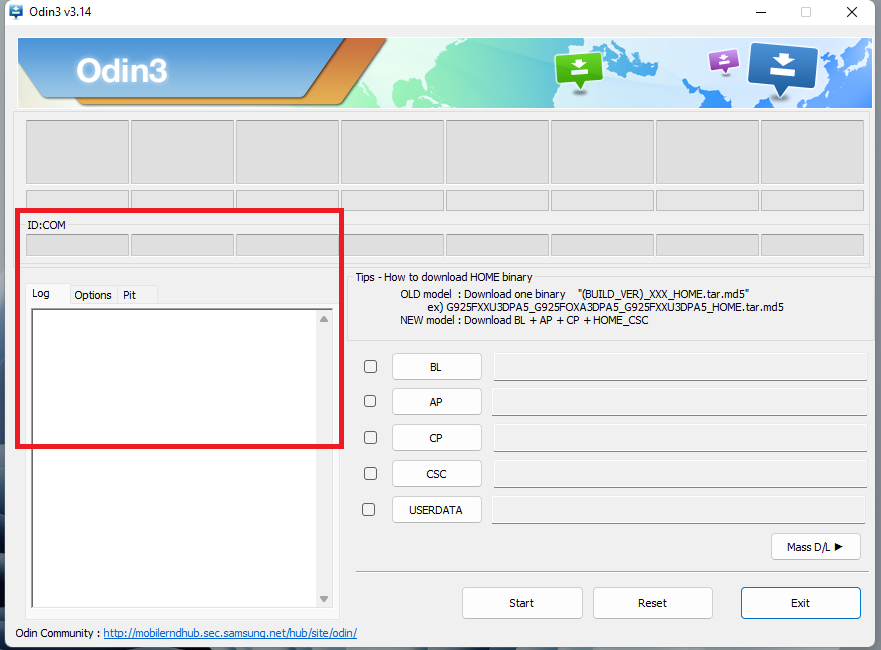
- Pay attention to the upper-left corner of the Odin window that says ID:COM.
- Below that should say “Added!” under the Log tab (This is the indicator that tells you the device is connected to download mode).
- The Odin window should show some slots that say BL, AP, CP, and CSC.
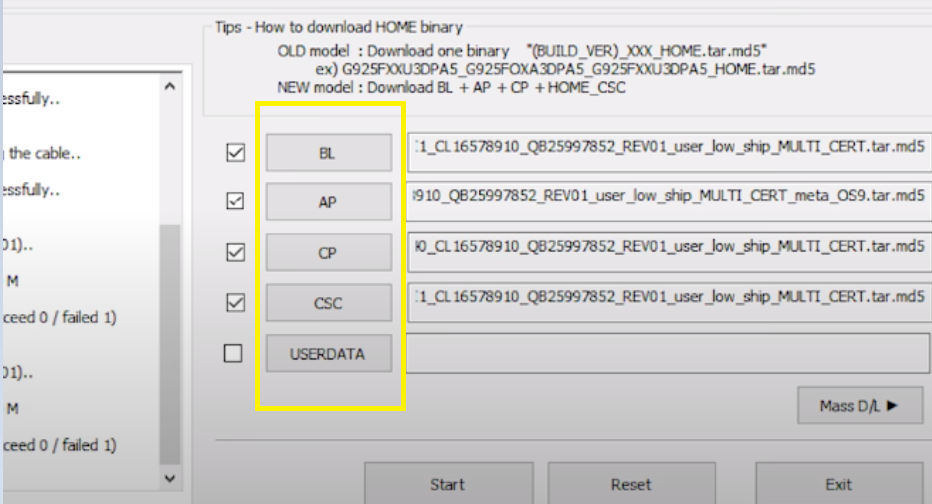
- In those slots, put the corresponding binary files from the firmware zip file you downloaded using Bifrost.
Note: In the CSC slot, if you flash the CSC binary file, your phone’s data will be wiped. Flashing the Home_CSC binary file will let you keep your phone’s data.
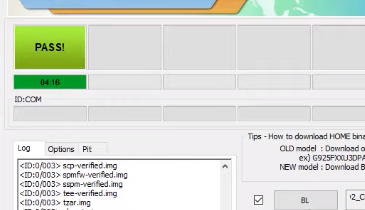
- Once you’re ready, click the Start Button (Odin and your phone should display a progress bar).
- Never unplug your devices while the process is running.
- A text that says “Pass!” over ID:COM indicates that the flashing process has been completed.
To confirm if the installed firmware is the same one you downloaded, go to your phone’s Settings > About Device > Software Information > Build Number. The Build number should match the value on your downloaded firmware package.
5. Pay a visit to a Samsung Care Center.
| Degree of difficulty: | Very easy |
| Approximate time needed: | Half a day to one day |
| Possible $$ needed: | Depends on the diagnostics |
One of the methods above should have sufficed in fixing the booting issue on the Samsung Galaxy M series.
However, letting professionals handle the job is wise if all else fails. Take note that this action should be undertaken as a last resort.
Visiting a local Samsung Service Center can be scary for some as they want to avoid spending money on repair fees. However, letting professionals look at your Samsung device is a win/win scenario.
Not only will this put the responsibility off your shoulder, but it will also ensure that your Samsung phone is taken care of in the best way possible.
Sometimes, trying to fix things on your own can cause your device more harm than good. For one, permanently damaging your phone will cost you more money in the end.
Fortunately, you don’t have to show up randomly and fall in line if you plan to visit for a repair, as they let you book an appointment online.
Booking an appointment ahead of time helps you pick a convenient date and time for your visit. You can also track the progress of your phone’s repair.
In a Wrap
Learning how to fix the booting issue on your fave Samsung M smartphone starts with due diligence. But soaking yourself into the key text, as the guidelines above, should help you stay out of trouble and get your phone working like new.