Isn’t it annoying when your smartphone tells you it’s about to install an app when the fact remains that the particular app already exists on your phone? The good news is there’s an explanation for this — and timely hacks to keep things in order.
In this post, we’ll show you the top six proven methods to stop a pesky “app will be installed on your device soon” notification on your phone. Don’t worry; we’ve added some pictures and critical details so you can factor each solution in a flash.
Why is there a “App Will Be Installed on Your Device Soon” notification when the app is already installed?
Software bugs and errors are the common reasons why an alert like the “app will be installed on your device soon” lingers on your phone’s notification panel. This faulty notification stays even when the app’s installation is already completed.
This means this issue is software-triggered and doesn’t have anything to do with your smartphone hardware. Thus, this tells you that to keep this notification under lock and key, you need to ensure software issues are out of the way.
Ways to Remove the “App Will Be Installed On Your Device Soon” Notification
Here are the different ways to stop the Google Play Store notification that says “app will be installed on your device soon.” Please note that the instructions below may not be exactly the same for some Android phone brands.
In this regard, we urge you to check your device’s user manual to be sure. Still, the solutions below should give you an idea.
FIX 1. Soft reset your phone
| Difficulty | Very Easy ●○○○○ |
| Number of Steps | 3 |
| Time to Perform Fix | 30 seconds |
| Things Needed | • An Android phone |
If the notification on your Android phone keeps saying that the app will be installed on your device soon, you need to perform a soft reset to remove it. This notification may stay even when the app is installed due to an error on the phone’s software.
A simple soft reset procedure should be enough to fix the minor error occurring on your Android phone. This will only refresh the system memory of your phone, so you don’t have to worry about your installed apps and data being removed.
Once your Android phone reboots, its system should be able to correct the error by itself. Plus, the reset process should improve the overall performance of your phone.
Step 1: Press and hold your Android phone’s power button.
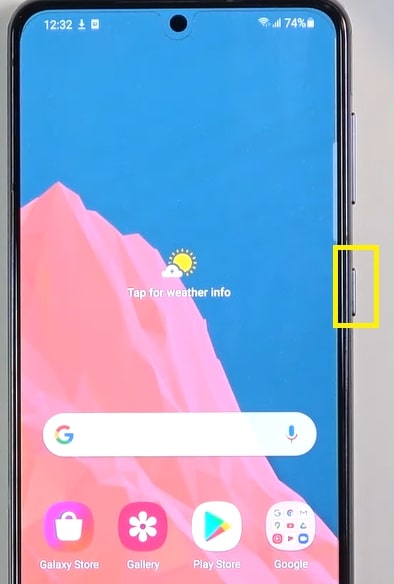
Step 2: Click the Restart option on your Android phone’s power menu to perform a soft reset.
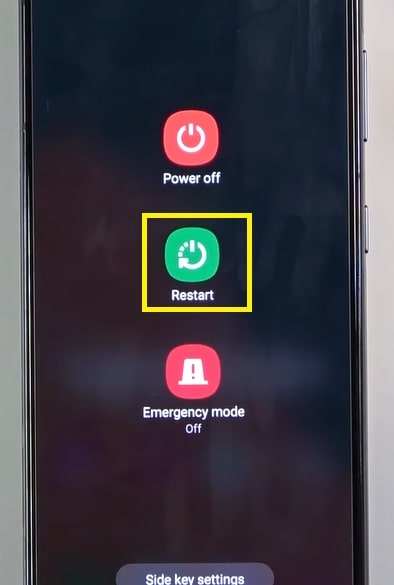
Step 3: Wait until your Android phone completes its reboot process.
FIX 2. Reinstall the faulty app using Google Play Store
| Difficulty | Very Easy ●○○○○ |
| Number of Steps | 6 |
| Time to Perform Fix | 60 seconds |
| Things Needed | • An Android phone • A working internet connection |
When your Android phone is installing an app, software errors may mess up the installation process and cause various issues. This is evident when the app keeps saying that it’s installing, but you already see it available on the home menu.
In such cases, a problem during the installation likely caused the app to malfunction and misbehave. It’s not a good look for a newly installed app, so it might not be the last error you’ll encounter as a result of this.
Therefore, it might be better to reinstall the app in question by removing it from your phone and downloading it again. Doing so should undo the previous installation and replace it with a new app without the same problems.
Step 1: Press and hold the app icon you want to reinstall from your Android phone.
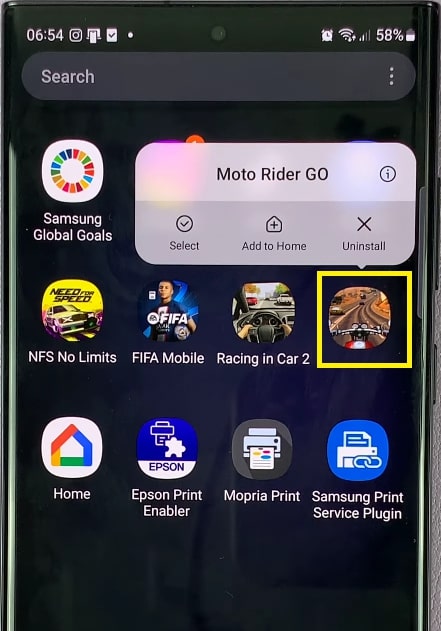
Step 2: Press the Uninstall option on the options pop-up.
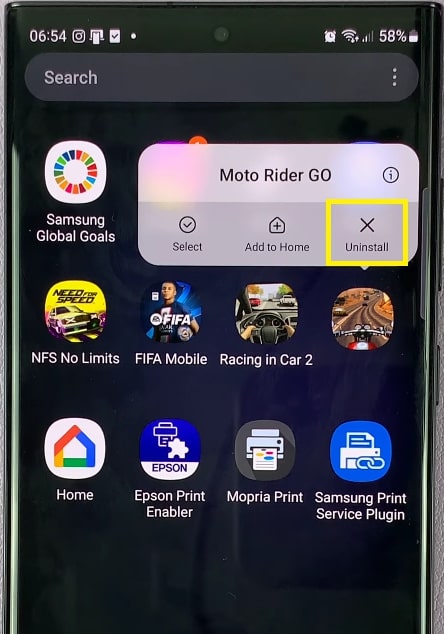
Step 3: Click Ok to confirm the app’s uninstallation.
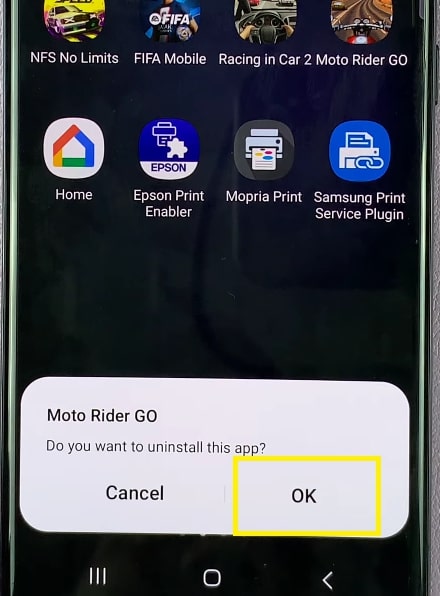
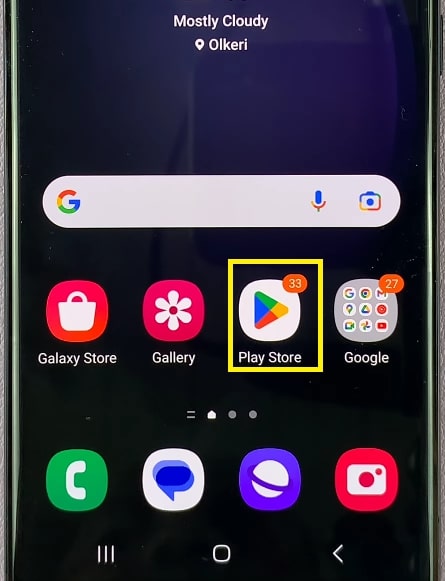
Step 4: Open your Android phone’s Google Play Store app.
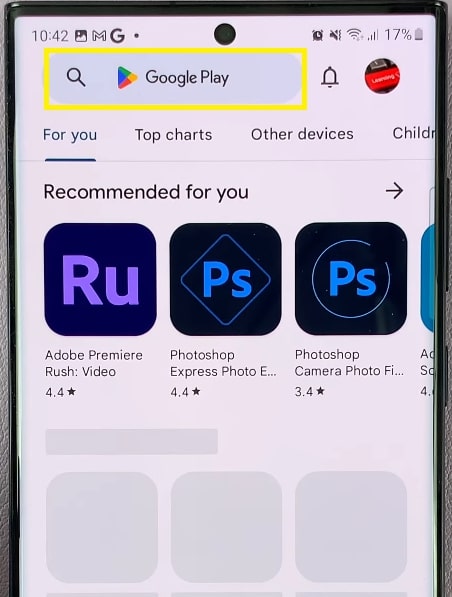
Step 5: Use the search bar to locate the app your want to reinstall.
Step 6: Click the Install button next to the app to download and install it on your Android phone.
FIX 3. Wipe your phone’s cache partition
| Difficulty | Very Easy ●○○○○ |
| Number of Steps | 8 |
| Time to Perform Fix | 60 seconds |
| Things Needed | • An Android phone • A USB cable |
This method can be treated as an extension of the previous solution since this can be used if it didn’t remove the app will be installed on your device soon error message. By wiping the phone’s cache partition, you delete all junk data.
It’s a useful tool for removing any temporary data from the app you’ve previously uninstalled. Thus, this method works well as a supplementary procedure for the reinstallation process we discussed earlier.
Once your phone’s cache partition is wiped, it should increase the device’s processing speed, which helps counteract various errors. You can also use this to remove corrupt and cluttered data that cause many system malfunctions.
Step 1: Plug a USB cable into your Android phone and swipe down on it notification panel twice.
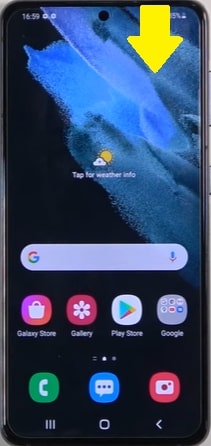
Step 2: Click the power key to bring up the power menu.
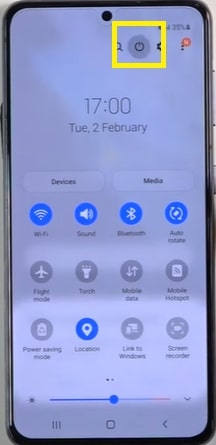
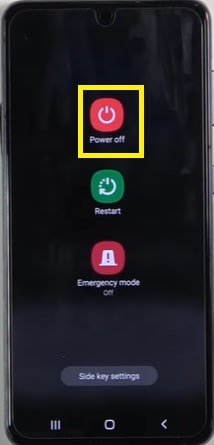
Step 3: Click Power Off and wait for your Android phone to shut down.
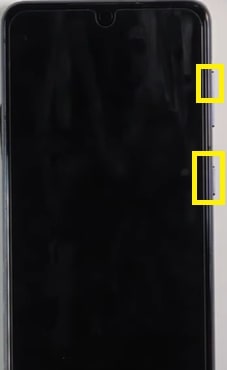
Step 4: Press and hold your Android phone volume-up and power buttons simultaneously to boot it into recovery mode.
Step 5: Use the volume down button to highlight the Wipe cache partition and click the power button to select it.
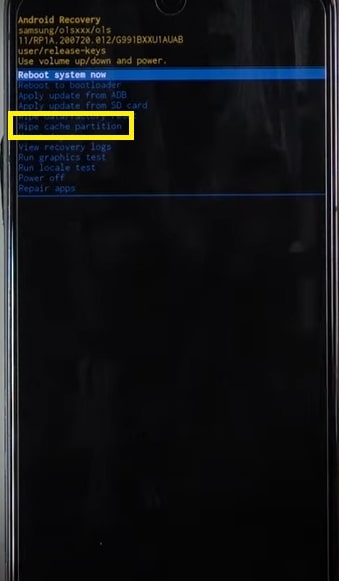
Step 6: Select Yes.
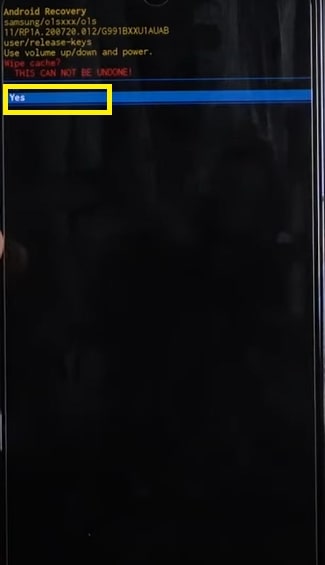
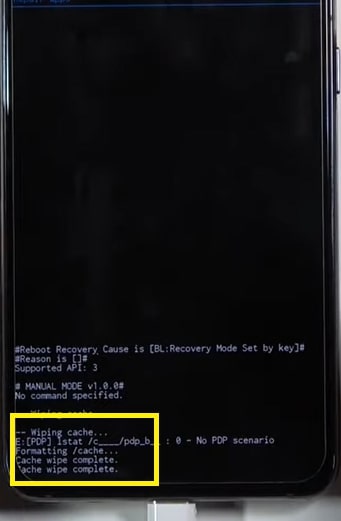
Step 7: Wait until the completion message appears on the screen’s bottom.
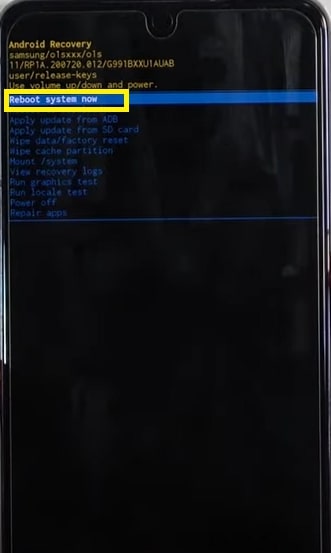
Step 8: Select Reboot system now to restart your Android phone back to normal mode.
Aside from wiping your phone’s cache partition, we also recommend deleting the app cache of your Google Play Store. App cache is a separate storage so the notification error might result from a corrupt temporary file stored by the play store.
FIX 4. Don’t download or install apps simultaneously
| Difficulty | Very Easy ●○○○○ |
| Number of Steps | 5 |
| Time to Perform Fix | 30 seconds |
| Things Needed | • A good signal reception |
Believe it or not, downloading multiple apps at once using your Android phone’s Google Play Store app can also be the root cause of installation errors.
In theory, multitasking shouldn’t be a problem for a smartphone, but it all depends on the device’s capabilities.
Lower-end phones will have difficulty performing more tasks simultaneously, so it’s always good to limit your downloads to one if you can. This will help your Android focus its RAM on a job that it can handle effectively without lowering its performance.
This method will help prevent errors like the one where Google Play says the app is already installed when it’s not showing up on your phone’s menu. Mistakes like this can occur if the Android phone can’t keep up with all the tasks you’re asking it to do.
Step 1: Open your Android phone’s Google Play Store app.
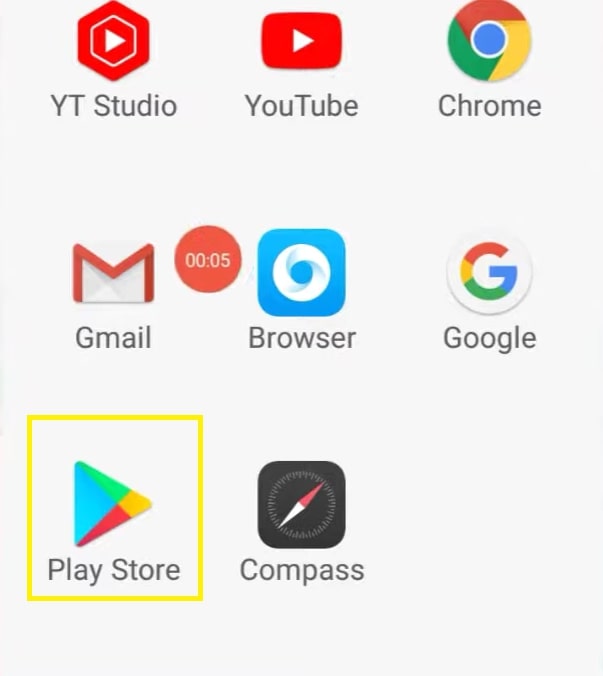
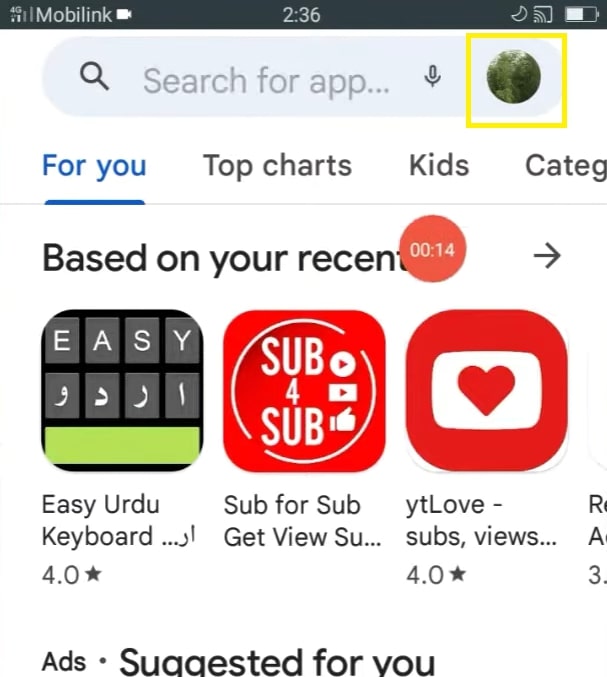
Step 2: Click your Google account’s profile icon in the screen’s upper-right corner.
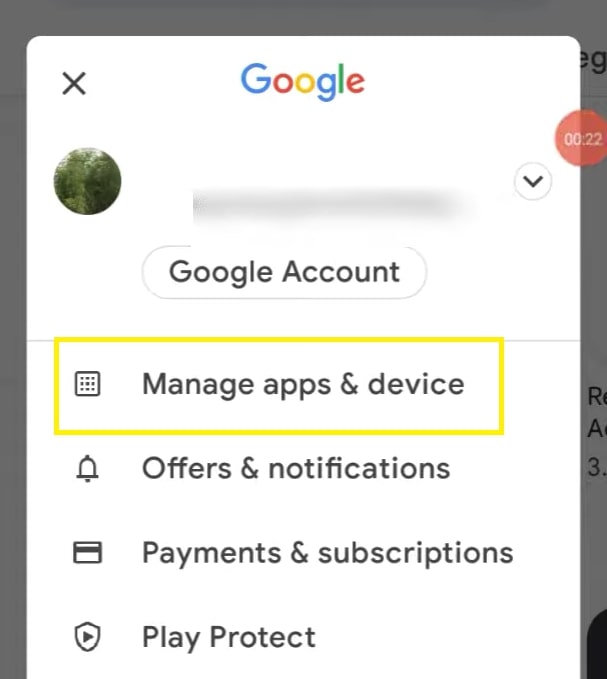
Step 3: Go to the “Manage apps & device” option.
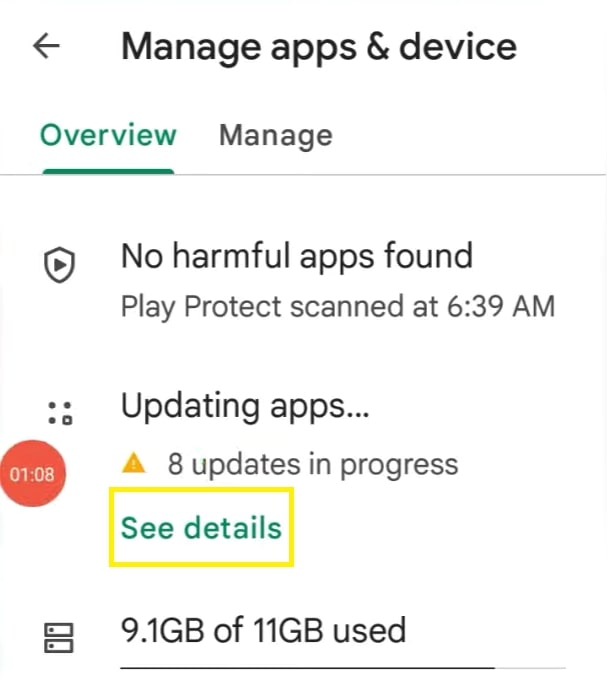
Step 4: Click See Details to check the app being downloaded and installed on your Android phone.
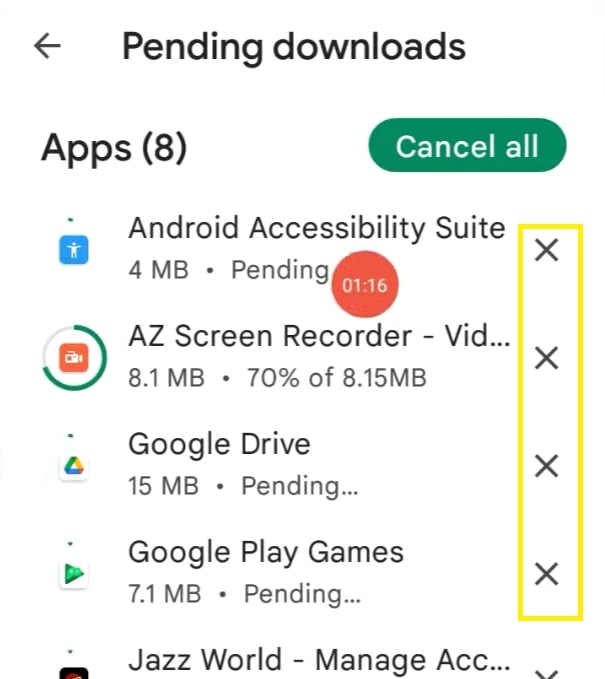
Step 5: Press the X icon beside the pending downloads so your phone only downloads and installs one app at a time.
FIX 5. Disable the Google Play Store’s notifications
| Difficulty | Very Easy ●○○○○ |
| Number of Steps | 6 |
| Time to Perform Fix | 30 seconds |
| Things Needed | • An Android phone |
Sometimes, the notification that says “app will be installed on your device soon” is more annoying than the error. It’s a common concern for many phone users who prefer to keep their user interface clean and clutter-free.
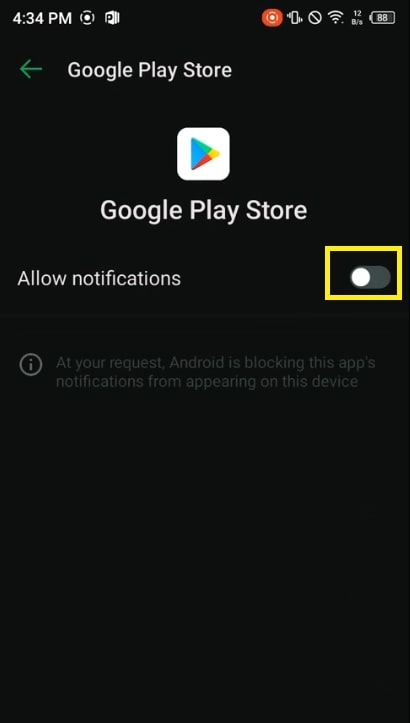
In such cases, lifting the Google Play Store notification should be enough to lift some of that pent-up frustrations. This can be done by disabling all the notifications from the Google Play Store app.
The only downside to this is that you’ll miss out on other Google Play Store errors that will happen in the future. Thus, you have to think this through before you decide not to allow all of Google Play Store’s notifications on your Android phone.
Step 1: Open the Android phone’s Settings menu.
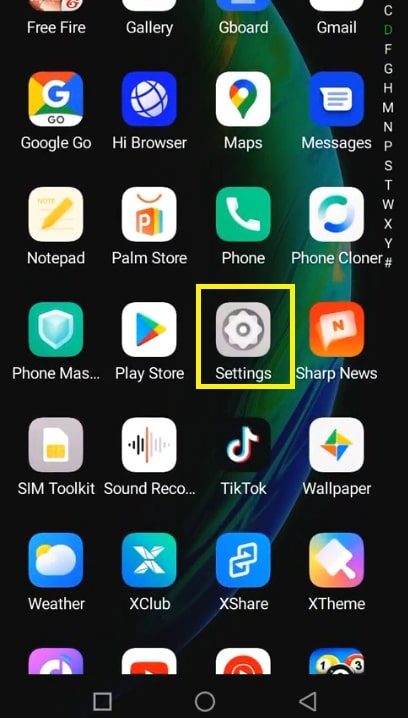
Step 2: Go to App Management.
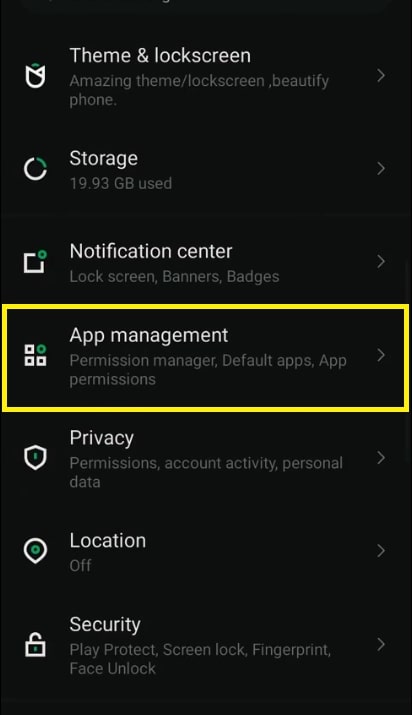
Step 3: Go to App Settings.
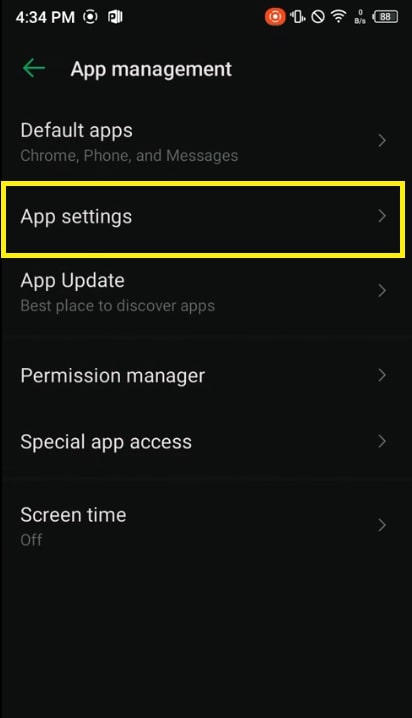
Step 4: Select the Google Play Store.
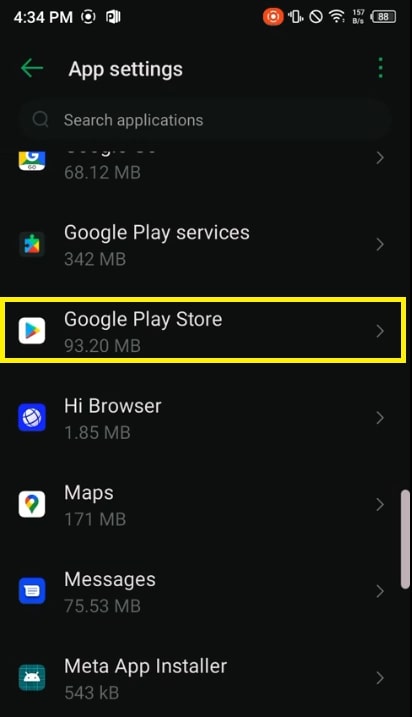
Step 5: Click the Notifications option.
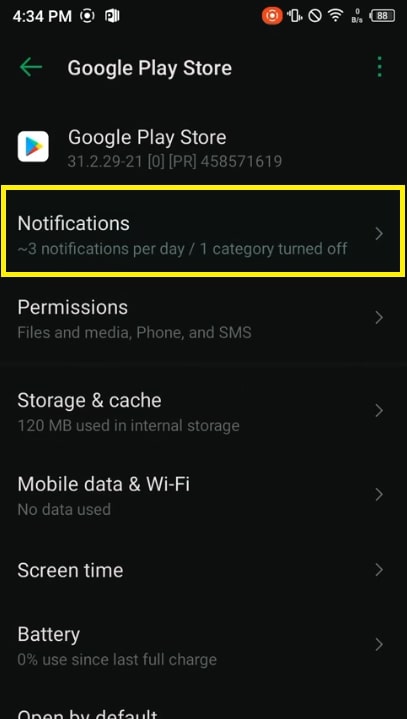
Step 6: Toggle the Allow Notifications switch off to disable this app’s notifications.
FIX 6. Perform a factory reset
| Difficulty | Very Easy ●○○○○ |
| Number of Steps | 6 |
| Time to Perform Fix | 2 minutes |
| Things Needed | • An Android phone • A USB cable |
Finally, a factory reset is your last resort if none of the previous solutions removed the annoying Google Play Store notification. After all, this method delivers the best result when it comes to troubleshooting a faulty Android phone or app.
The only issue is that factory resetting your Android phone will also remove all of its stored data, which is how this method roots out the cause of the problem. Please note that some phones allow you to back up your data so it’s not always gone forever.
Be sure to set up your Android phone after the reset since this process will boot it up without its previous data and settings configuration. You can think of this as preparing a newly bought phone for use.
Step 1: Plug a USB cable into your Android phone and press and hold its volume down and power button to force it to shut down.
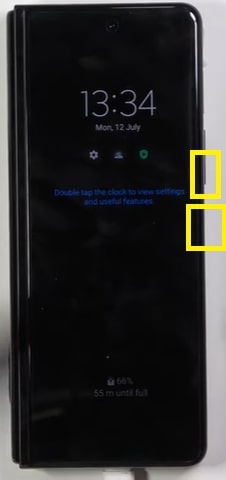
Step 2: Press and hold your Android phone’s volume up and power button to boot it into recovery mode.
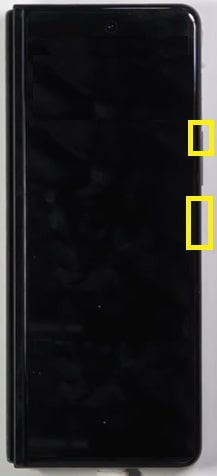
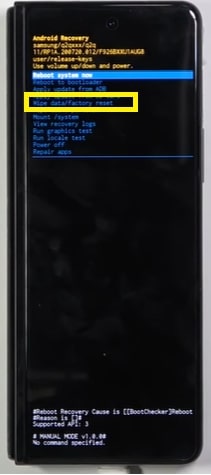
Step 3: Scroll down and select the Wipe data/factory reset option.
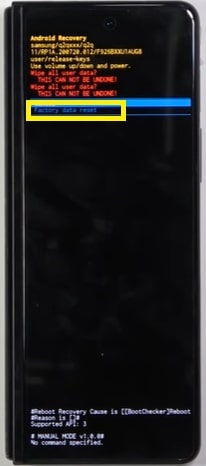
Step 4: Scroll down and select the Factory data reset option.
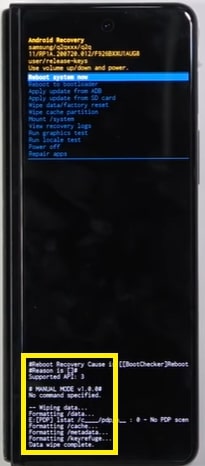
Step 5: Wait until the completion message appears on the screen’s bottom.
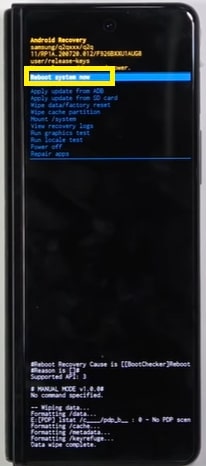
Step 6: Select Reboot system now to restart your Android phone back to normal mode.

!['App Will Be Installed on Your Device Soon' for an App I Already Have [How to Fix]](https://www.techjive.com/wp-content/uploads/2024/01/App-Will-Be-Installed-on-Your-Device-Soon-for-an-App-I-Already-Have-How-to-Fix.jpg)


