Indeed, the person behind AirDrop must be a genius, but once, I lost my patience as AirDrop kept canceling the file transfers from my sister’s iPhone to my MacBook. The persistent connection problem nearly pushed me to my breaking point.
It’s absurd how a handy file-sharing feature can single-handedly ruin your day. Thus, I was hell-bent on not succumbing to the same problem again and immediately worked to find practical solutions.
So, if you’re sick of AirDrop constantly failing you when it matters, your worrying days are over. In this post, we’ll share nine methods for fixing the problem with your AirDrop canceling your file transfers midway.
Why does AirDrop keep failing?
AirDrop will fail and cancel your file transfers if you turn off its visibility settings on your iPhone, iPad, or Mac. Plus, you can’t AirDrop files if your devices are sleeping, are distanced, or have network connectivity problems.
How to Fix AirDrop for iPhone, iPad, and Other iOS Devices
The fixes below should address the faulty AirDrop feature on your iPhone, iPad, and other iOS devices. We recommend carefully following our instructions to restore your device’s AirDrop feature to its peak working condition.
FIX 1. Enable AirDrop and change its visibility
| Difficulty | Very Easy ●○○○○ |
| Number of Steps | 4 |
| Time to Perform Fix | 15 seconds |
| Things Needed | An iPhone or any compatible Apple device |
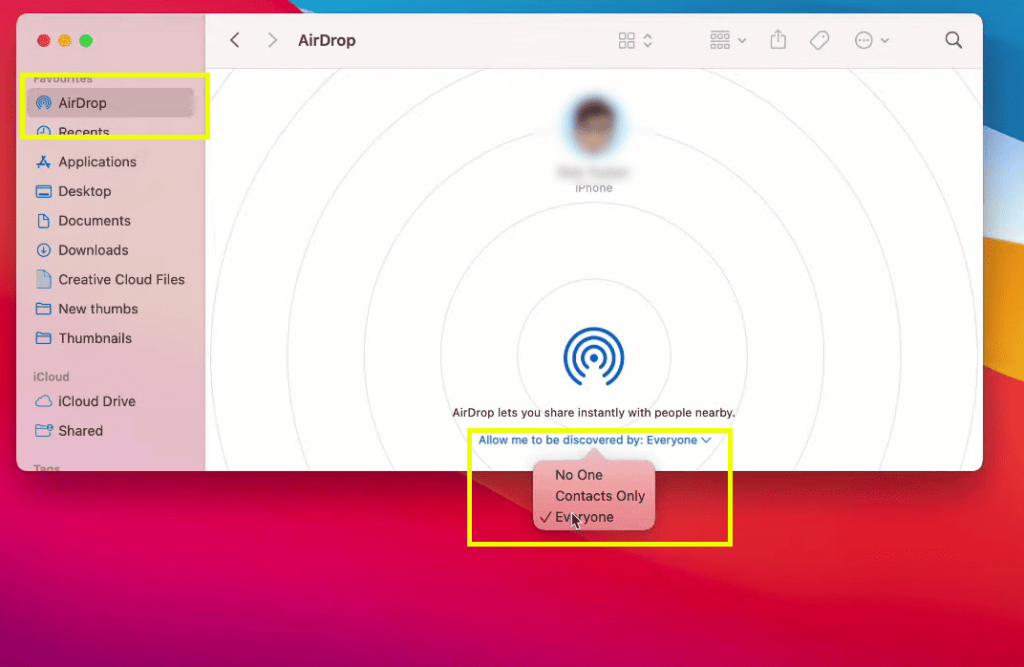
Changing the visibility settings of your iPhone, iPad, or Mac’s AirDrop feature is essential for it to work without issues. This configuration dictates whether this transfer feature is enabled and if your nearby iOS devices can use it.
Thus, it’s reasonable to think your visibility settings are off whenever your AirDrop cancels the file transfer suddenly. Then, you must reconfigure this feature from your iPhone or iPad’s control center panel under the network services tile.
Doing so will let you select whether to make your iOS devices accessible for AirDrop file transfers with your contacts or everyone else. Your iPhone, iPad, or Mac’s AirDrop feature is only active once you make it visible to nearby compatible devices.
| Step 1: Swipe down and open your iPhone/iPad’s control center panel. |
| Step 2: Expand the network services tile to expand it and reveal more options. |
| Step 3: Click the AirDrop icon. |
| Step 4: Activate AirDrop by setting its visibility to Contacts Only or Everyone. |
On a Mac, you can enable the AirDrop feature and change its visibility settings by opening the Finder app. If AirDrop isn’t accessible from the Finder app yet, select it under the Go option in your home screen’s menu bar.

Once the visibility settings are enabled, right-clicking a file will show the AirDrop option and let you transfer it to nearby compatible iOS devices.
FIX 2. Ensure your devices are awake
| Difficulty | Very Easy ●○○○○ |
| Number of Steps | 4 |
| Time to Perform Fix | 15 seconds |
| Things Needed | An iPhone or any compatible Apple device |
It doesn’t always mean there’s a technical problem when your AirDrop keeps getting canceled. For instance, letting one of your iOS devices go to sleep mode can accidentally stop your file transfer.
Since sleep mode turns off the device’s screen, it may block the peer-to-peer connection or turn off the visibility settings. As a result, this will compromise the AirDropping process, stopping it in its tracks until you wake your device up.
You can typically wake up your iPhone or iPad with a click of the side button. However, tapping its turned-off touchscreen makes waking your sleeping device quicker and more straightforward.
Although this is more convenient, you must enable this feature before using it. It’s called the Tap to Wake feature, but some iOS devices may have the Raise to Wake feature instead.
| Step 1: Go to Settings. |
| Step 2: Go to Accessibility. |
| Step 3: Go to Touch. |
| Step 4: Scroll down and turn on the Tap to Wake switch. |
FIX 3. Ensure your devices are nearby
| Difficulty | Very Easy ●○○○○ |
| Number of Steps | 1 |
| Time to Perform Fix | 5 seconds |
| Things Needed | An iPhone or any compatible Apple device |
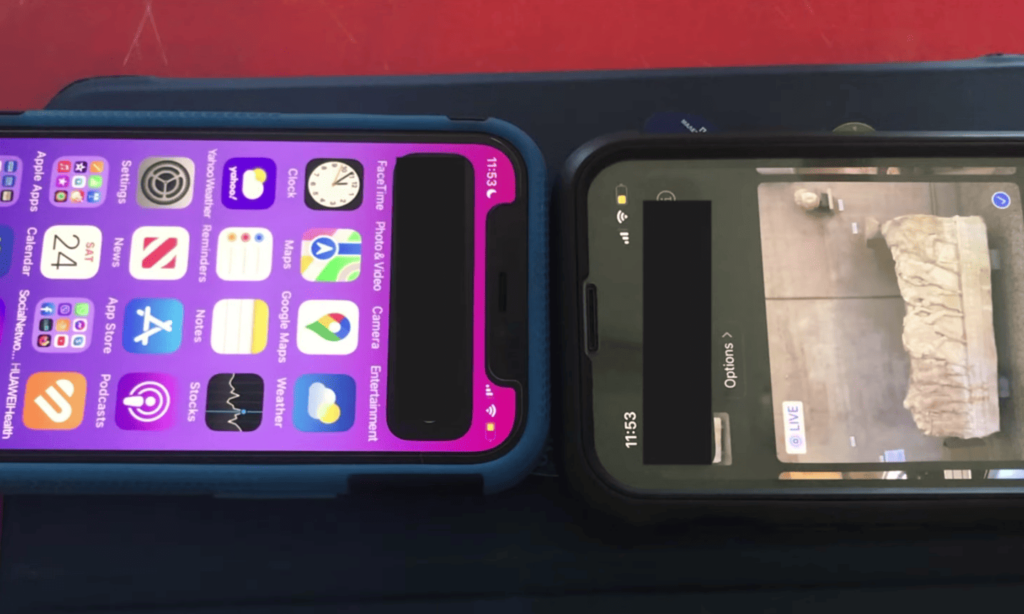
Another thing you must carefully observe while AirDropping some files on your iOS devices is the distance between them. After all, these devices communicate using a peer-to-peer connection via their WiFi or Bluetooth connectivity features.
However, you must note that although it uses the WiFi functionality, it doesn’t have to connect to a network with an internet connection. Instead, your AirDropping devices establish a direct connection between them to facilitate the file transfer.
Therefore, you must keep both devices close to each other to ensure their strong and stable connection. Otherwise, keeping them apart might break the connection, which explains why your AirDrop keeps canceling as it progresses.

More importantly, you must observe the appropriate distance because you can use Bluetooth to connect your iOS devices for AirDropping. Remember, Bluetooth is a short-range technology, so the correct distance will dictate how well it can work.
FIX 4. Restart your devices
| Difficulty | Very Easy ●○○○○ |
| Number of Steps | 5 |
| Time to Perform Fix | 40 seconds |
| Things Needed | An iPhone or any compatible Apple device |
Sometimes, your iPhone or iPad’s feature may malfunction because of a problem with the device. A common reason for this is minor software bugs and errors that can randomly pop up during use, even when your smartphone is doing well earlier.
Corrupt temporary data can influence the emergence of these bugs and errors, so it’s advisable to restart your device whenever necessary. Doing so will refresh its system memory and delete the temporary data it stores during use.
As a result, you’ll notice an improvement in your iPhone or iPad’s performance as soon as it boots up. Afterward, you can try the AirDrop feature again to confirm whether or not the restart sequence addressed your device’s minor bugs and errors.
This method’s success should be easy to determine because AirDrop shouldn’t cancel the file transfers in your subsequent attempts.
| Step 1: Hold the iPhone/iPad’s side button and one of its volume buttons. |
| Step 2: Swipe the device’s power slider to the right and wait for it to turn off. |
| Step 3: Hold the side button to power your iPhone/iPad. |
| Step 4: Release your iPhone/iPad’s side button when Apple’s logo appears, and wait for it to finish the bootup sequence. |
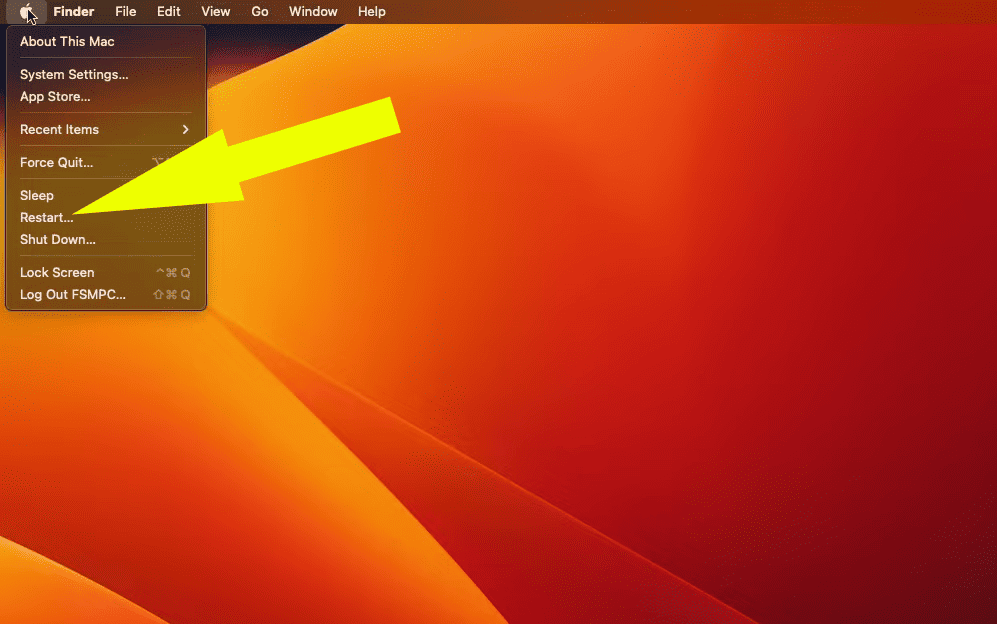
To reboot your Mac, go to the Apple menu and select the Restart option.
Alternatively, you can hold its physical power button to force it to shut down when unresponsive.

After shutting down your Mac, press its power button again to turn it back on and let it reboot its system.
FIX 5. Update your devices
| Difficulty | Very Easy ●○○○○ |
| Number of Steps | 9 |
| Time to Perform Fix | 5 minutes |
| Things Needed | An iPhone or any compatible Apple device A working internet connection |
Unfortunately, not all system bugs and errors are caused by temporary data, making a restart sequence insufficient. In such cases, the likely reason your iOS device malfunctions could be its software version is outdated.
Like other features, AirDrop receives an update whenever a new version of iOS is available for download. Sometimes, these updates can range from simple quality-of-life changes to a massive overhaul of the feature’s functionality.
The only constant is improving the feature’s stability and compatibility with your device. As such, it could decide whether your iOS device’s AirDrop feature will work correctly.
Although this guide is for fixing your faulty AirDrop feature, don’t underestimate the importance of a software update. After all, even if it doesn’t stop AirDrop from canceling your file transfers, its benefits are always worth it.
| Step 1: Go to Settings. |
| Step 2: Go to General. |
| Step 3: Click Software Update. |
| Step 4: Wait for your iPhone/iPad to check for a software update. |
| Step 5: Click the update and tap “Download and Install.” |
| Step 6: Enter your iPhone/iPad’s passcode. |
| Step 7: Read the provided terms and conditions and click Agree. |
| Step 8: Click Agree again. |
| Step 9: Wait while your iPhone/iPad downloads and installs the iOS update. Note: Plug your iPhone/iPad into a power source while updating so it doesn’t run out of battery, which may result in a terrible software problem. |
FIX 6. Turn off your Mac’s Firewall settings
| Difficulty | Very Easy ●○○○○ |
| Number of Steps | 4 |
| Time to Perform Fix | 15 seconds |
| Things Needed | A MacBook or any compatible Apple device |
Transferring your files via AirDrop is as simple for MacBooks as for iPhones and iPads. However, what makes your Mac different is the presence of its Firewall settings, serving as its dedicated network security system.
When enabled, your Mac’s Firewall can block contact with other computers, including file-sharing attempts by nearby AirDropping devices. Thus, it could be why your AirDrop keeps failing your Mac’s file transfers with your iPhone or iPad.
If you want the AirDropping process to proceed without issues, turning off your Mac’s Firewall settings might be a good idea. After the file transfer, you can turn it back on to protect your device.
| Step 1: Open System Settings. |
| Step 2: Go to Network. |
| Step 3: Go to Firewall. |
| Step 4: Turn off your Mac’s Firewall settings. |
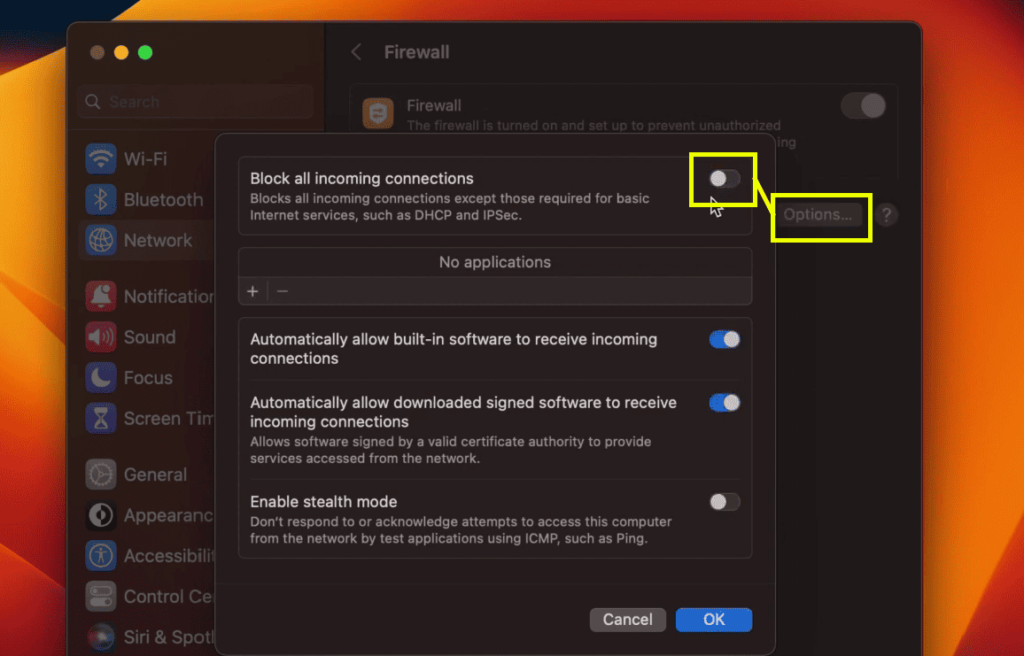
Surprisingly, you don’t have to turn off your Mac’s Firewall to allow file sharing through the AirDrop feature. If you want to keep the Firewall active, you can go to its options menu and turn off “block all incoming connections.”

Turning off this switch allows your Mac to participate in file sharing with other devices, even when its Firewall is active. This way, you don’t have to compromise its security to AirDrop some files.
FIX 7. Turn your network services off and on
| Difficulty | Very Easy ●○○○○ |
| Number of Steps | 3 |
| Time to Perform Fix | 10 seconds |
| Things Needed | An iPhone or any compatible Apple device |
Another thing you can do is turn your iPhone, iPad, or Mac’s network services off and on in quick succession. This action will refresh your connectivity features and let them correct any bugs or errors causing them to malfunction.
This method is ideal for soft resetting your iOS device’s WiFi or Bluetooth connections since you can toggle them through a switch. It works similarly to a restart but only affects your device’s network services.
However, you can only use this to fix simple errors causing AirDrop to keep canceling your file transfers. In particular, this solution is best after restarting your iPhone, iPad, or Mac.
It should help with minor errors the system refresh from restarting your device can’t address.
| Step 1: Swipe down and open your iPhone/iPad’s control center panel. |
| Step 2: Turn off the WiFi and Bluetooth. |
| Step 3: Turn the WiFi and Bluetooth back on. |
FIX 8. Switch to WiFi
| Difficulty | Very Easy ●○○○○ |
| Number of Steps | 1 |
| Time to Perform Fix | 5 seconds |
| Things Needed | An iPhone or any compatible Apple device |
Because AirDrop works with WiFi or Bluetooth, you can choose whichever connectivity feature you prefer when transferring files between your iOS devices. But that doesn’t mean that one of these connectivity features is superior to the other.
After all, WiFi provides faster transfer speeds than Bluetooth, making it the optimal choice. This speed advantage means it takes less time to finish a file transfer, giving the AirDrop feature fewer chances to stop the sharing process midway.
FIX 9. Reset network settings
| Difficulty | Very Easy ●○○○○ |
| Number of Steps | 7 |
| Time to Perform Fix | 40 seconds |
| Things Needed | An iPhone or any compatible Apple device |
Re-adjusting the network settings is the best way to deal with your iOS device’s connectivity problems. After all, connection errors are often the result of changes you make to your iPhone, iPad, or Mac’s network configuration.
Thankfully, undoing these changes is easy as long as you remember the adjustments you made thus far. Otherwise, checking every network configuration on all iOS devices participating in the AirDropping process might be time-consuming.
Luckily, iOS devices have a reset option to revert all your network settings in one fell swoop. This way, you don’t have to undo the changes you made one at a time, which might take long to complete.
With the network reset, you can restore your iPhone, iPad, or Mac’s default connectivity settings. Once complete, you can test whether or not this addresses the problem causing your AirDrop to keep canceling its file transfers.
| Step 1: Go to Settings. |
| Step 2: Go to General. |
| Step 3: Select “Transfer or Reset iPhone.” |
| Step 4: Go to Reset. |
| Step 5: Click “Reset Network Settings.” |
| Step 6: Enter your iPhone/iPad’s passcode. |
| Step 7: Click “Reset Network Settings” to restore the device’s initial network configuration. Note: Restart your iPhone/iPad afterward to apply the changes to your network settings. |

![Does your AirDrop keep canceling [Causes and Fixes 2023]](https://www.techjive.com/wp-content/uploads/2024/02/Does-your-AirDrop-keep-canceling-Causes-and-Fixes-2023.png)


